---
title: "Approve an Object"
description: "Send an object for approval, attach supporting evidence, and track it through to production."
---

<div style="padding: 14px 16px; border: 0.5px solid #AFA9EC; border-radius: 12px; background: #EEEDFE; margin-bottom: 1.5rem;">
  <div style="display: flex; align-items: center; gap: 7px; margin-bottom: 8px;">
    <svg width="16" height="16" viewBox="0 0 16 16" fill="none">
      <path d="M9 2L4 9h4l-1 5 5-7H8l1-5z" stroke="#7f77dd" stroke-width="1.2" stroke-linecap="round" stroke-linejoin="round"/>
    </svg>
    <span style="font-size: 11px; font-weight: 500; letter-spacing: 0.05em; text-transform: uppercase; color: #534AB7;">TL;DR</span>
  </div>
  <div style="font-size: 13px; color: #3C3489; line-height: 1.65;">
    Open your object's <strong>Approvals</strong> tab, pick an Approval Workflow, click <strong>Request Approval</strong>, attach a simulation as evidence, and submit one request per responsibility. The object moves to <strong>Pending Approval</strong> until every responsibility has accepted.
  </div>
</div>

The same flow works for every object type (data elements, features, models, policies, global functions). Only the workflow and reviewers configured for that type may differ.

## Before you start

* The object must be registered (saved as a draft).
* A simulation must be run on the object so it can be attached as evidence. Admins can make this optional in **Settings**, but it is required by default.
* An Approval Workflow must exist for that object type (for example, a workflow configured for Models). See [Configure an Approval Workflow](/user-guide/admin-guide/configure-approval-workflow/).
* You need edit access to the object. Anyone with edit access can submit it for approval.

## The status flow at a glance

An object travels from **Draft** to **Approved**. When you request approval, the platform first checks the object's inputs and routes accordingly: drafts can be grouped into the request, pending inputs must be resolved first, and fully approved inputs let the request go straight to **Pending Approval**. </br>From there each reviewer accepts, asks for changes, or vetoes. A veto sends the object to **Rejected**, which you clone to start a fresh Draft. The flowchart below maps every branch; the rest of this page walks through these in detail.
<style>
.sl-markdown-content .approval-flow { max-width: 1240px; margin: 1.25rem auto 1.75rem; }
.sl-markdown-content .approval-flow .flow-wrap { width: 100%; }
.sl-markdown-content .approval-flow svg { display: block; width: 100%; height: auto; }
.sl-markdown-content .approval-flow .node text { font-family: var(--font-ui, ui-sans-serif, system-ui, sans-serif); font-size: 13px; font-weight: 600; text-anchor: middle; dominant-baseline: middle; }
.sl-markdown-content .approval-flow .node rect, .sl-markdown-content .approval-flow .node polygon { stroke-width: 1.5; }
.sl-markdown-content .approval-flow .n-draft rect { fill: var(--sl-color-gray-6, #f3f0ff); stroke: #9b7fe8; }
.sl-markdown-content .approval-flow .n-draft text { fill: var(--fg-strong, #3b1f8c); font-style: italic; }
.sl-markdown-content .approval-flow .n-pending rect { fill: #fef3c7; stroke: #d97706; }
.sl-markdown-content .approval-flow .n-pending text { fill: #78350f; }
.sl-markdown-content .approval-flow .n-approved rect { fill: #f0fdf4; stroke: #16a34a; }
.sl-markdown-content .approval-flow .n-approved text { fill: #14532d; }
.sl-markdown-content .approval-flow .n-rejected rect { fill: #fee2e2; stroke: #ef4444; }
.sl-markdown-content .approval-flow .n-rejected text { fill: #7f1d1d; }
.sl-markdown-content .approval-flow .n-action rect { fill: #dae8fc; stroke: #6c8ebf; }
.sl-markdown-content .approval-flow .n-action text { fill: #1e3a5f; }
.sl-markdown-content .approval-flow .n-decision polygon { fill: #fff9c4; stroke: #d6b656; }
.sl-markdown-content .approval-flow .n-decision text { fill: #374151; }
.sl-markdown-content .approval-flow .edge { fill: none; stroke: var(--gray-600, #333940); stroke-width: 1.5; }
.sl-markdown-content .approval-flow .elabel-bg { fill: var(--surface-0, #eef0f2); }
.sl-markdown-content .approval-flow .elabel { fill: var(--fg-muted, #3a3f45); font-family: var(--font-ui, ui-sans-serif, system-ui, sans-serif); font-size: 11.5px; text-anchor: middle; dominant-baseline: middle; }
</style>

<div class="approval-flow">
<div class="flow-wrap">
<svg viewBox="0 0 1200 430" role="img" aria-label="Object approval status flow" xmlns="http://www.w3.org/2000/svg">
  <defs>
    <marker id="af-arrow" viewBox="0 0 10 10" refX="9" refY="5" markerWidth="7" markerHeight="7" orient="auto-start-reverse">
      <path d="M0,0 L10,5 L0,10 z" fill="var(--gray-600, #333940)"></path>
    </marker>
  </defs>
  <path class="edge" d="M122,244 C170,236 215,205 248,188" marker-end="url(#af-arrow)"></path>
  <path class="edge" d="M312,120 C360,90 410,82 548,82" marker-end="url(#af-arrow)"></path>
  <path class="edge" d="M388,160 C520,160 650,175 792,202" marker-end="url(#af-arrow)"></path>
  <path class="edge" d="M330,200 C420,240 500,258 566,262" marker-end="url(#af-arrow)"></path>
  <path class="edge" d="M688,240 C730,232 762,225 792,222" marker-end="url(#af-arrow)"></path>
  <path class="edge" d="M912,206 C955,182 995,158 1032,146" marker-end="url(#af-arrow)"></path>
  <path class="edge" d="M918,222 C960,222 990,222 1030,222" marker-end="url(#af-arrow)"></path>
  <path class="edge" d="M1030,242 C985,262 950,250 918,236" marker-end="url(#af-arrow)"></path>
  <path class="edge" d="M910,244 C960,278 1010,312 1050,330" marker-end="url(#af-arrow)"></path>
  <path class="edge" d="M1042,352 C700,405 250,398 84,282" marker-end="url(#af-arrow)"></path>
  <g><rect class="elabel-bg" x="128" y="186" width="108" height="18" rx="3"></rect><text class="elabel" x="182" y="196">Request Approval</text></g>
  <g><rect class="elabel-bg" x="398" y="58" width="128" height="34" rx="3"></rect><text class="elabel" x="462" y="69">Some inputs in</text><text class="elabel" x="462" y="83">Pending Approval</text></g>
  <g><rect class="elabel-bg" x="560" y="158" width="118" height="18" rx="3"></rect><text class="elabel" x="619" y="168">All inputs approved</text></g>
  <g><rect class="elabel-bg" x="404" y="250" width="124" height="18" rx="3"></rect><text class="elabel" x="466" y="260">Some inputs in Draft</text></g>
  <g><rect class="elabel-bg" x="712" y="204" width="64" height="18" rx="3"></rect><text class="elabel" x="744" y="214">Yes, group</text></g>
  <g><rect class="elabel-bg" x="944" y="158" width="122" height="18" rx="3"></rect><text class="elabel" x="1005" y="168">All reviewers accept</text></g>
  <g><rect class="elabel-bg" x="918" y="196" width="104" height="18" rx="3"></rect><text class="elabel" x="970" y="206">Needs changes/info</text></g>
  <g><rect class="elabel-bg" x="936" y="292" width="90" height="18" rx="3"></rect><text class="elabel" x="981" y="302">Veto rejection</text></g>
  <g><rect class="elabel-bg" x="560" y="366" width="114" height="34" rx="3"></rect><text class="elabel" x="617" y="377">Clone to start</text><text class="elabel" x="617" y="391">a new version</text></g>
  <g class="node n-draft"><rect x="16" y="227" width="106" height="34" rx="17" ry="17"></rect><text x="69" y="245">Object in Draft</text></g>
  <g class="node n-decision"><polygon points="300,100 388,160 300,220 212,160"></polygon><text x="300" y="153">Check status of</text><text x="300" y="169">object&#39;s inputs</text></g>
  <g class="node n-action"><rect x="548" y="58" width="130" height="48" rx="6"></rect><text x="613" y="75">Resolve input</text><text x="613" y="91">approvals first</text></g>
  <g class="node n-decision"><polygon points="618,208 690,262 618,316 546,262"></polygon><text x="618" y="255">Group with</text><text x="618" y="271">draft inputs?</text></g>
  <g class="node n-pending"><rect x="792" y="205" width="126" height="34" rx="17" ry="17"></rect><text x="855" y="223">Pending Approval</text></g>
  <g class="node n-approved"><rect x="1032" y="122" width="100" height="34" rx="17" ry="17"></rect><text x="1082" y="140">Approved</text></g>
  <g class="node n-action"><rect x="1030" y="199" width="128" height="48" rx="6"></rect><text x="1094" y="216">Update and</text><text x="1094" y="232">Resubmit</text></g>
  <g class="node n-rejected"><rect x="1032" y="330" width="100" height="34" rx="17" ry="17"></rect><text x="1082" y="348">Rejected</text></g>
</svg>
</div>
</div>

## How to Send an Approval Request?

Follow these steps to send an object for approval and track it to a decision.

<details open class="step">
<summary>

#### Open the Approvals tab

</summary>

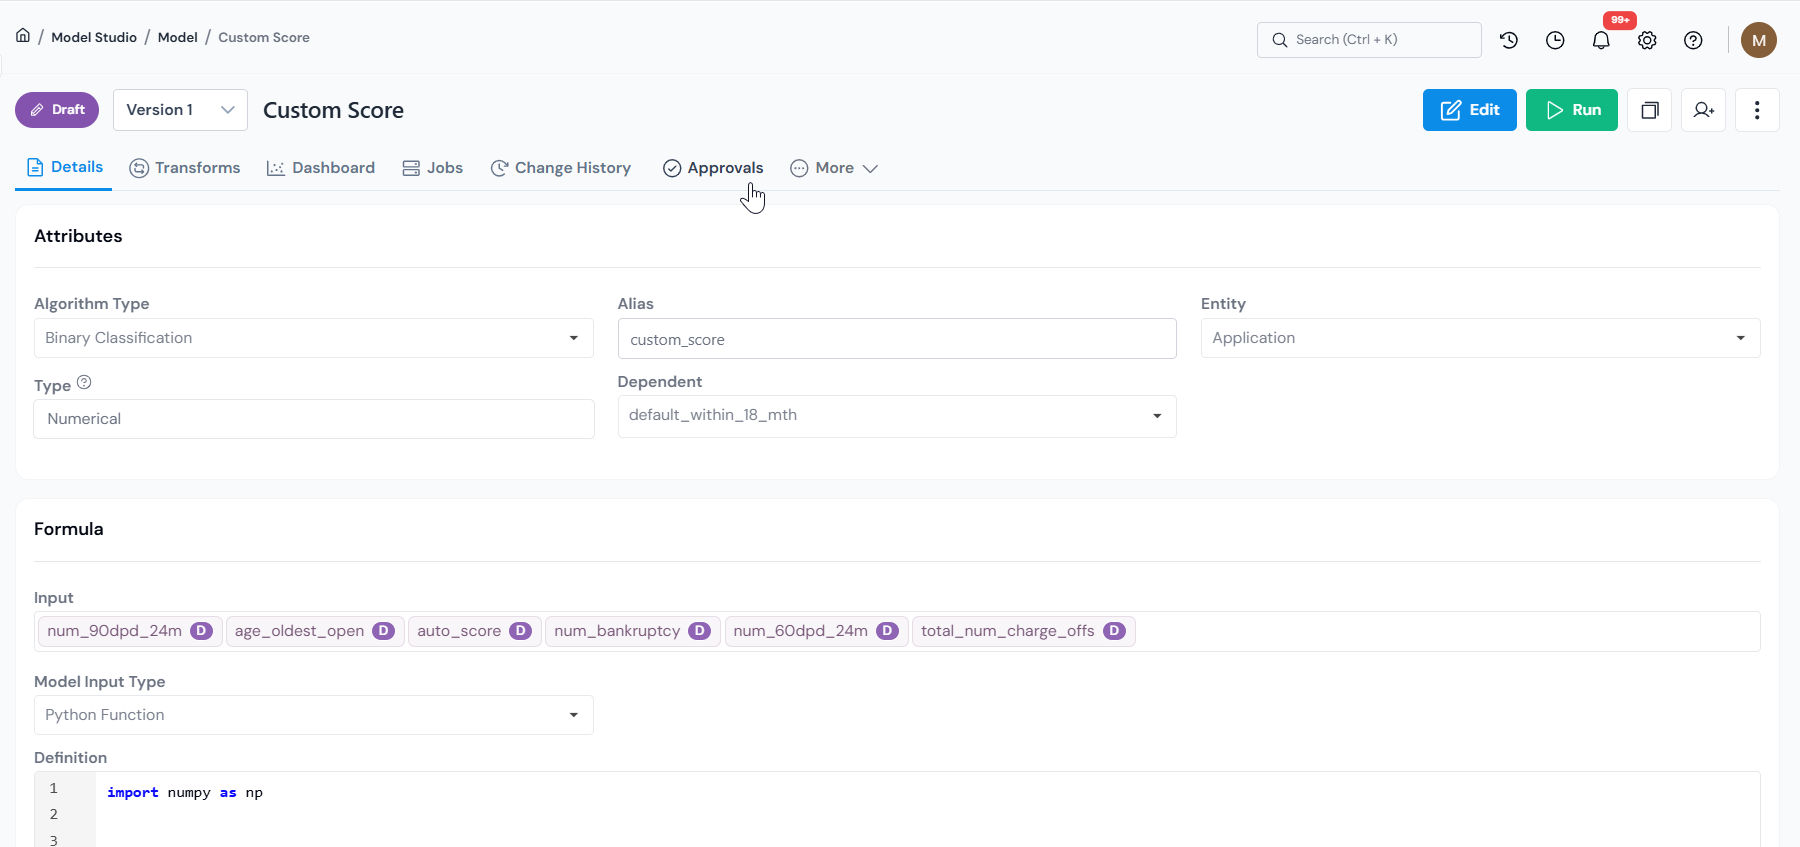
Open the object's details page and click the **Approvals** tab.

<figure>
  <img src="/images/how-tos/approve-an-object/send-approval-request-01-approvals-tab.png" alt="Object details page with the Approvals tab in the top navigation." class="screenshot" loading="lazy" />
  <figcaption>Open the object and switch to the <strong>Approvals</strong> tab to start the approval process.</figcaption>
</figure>

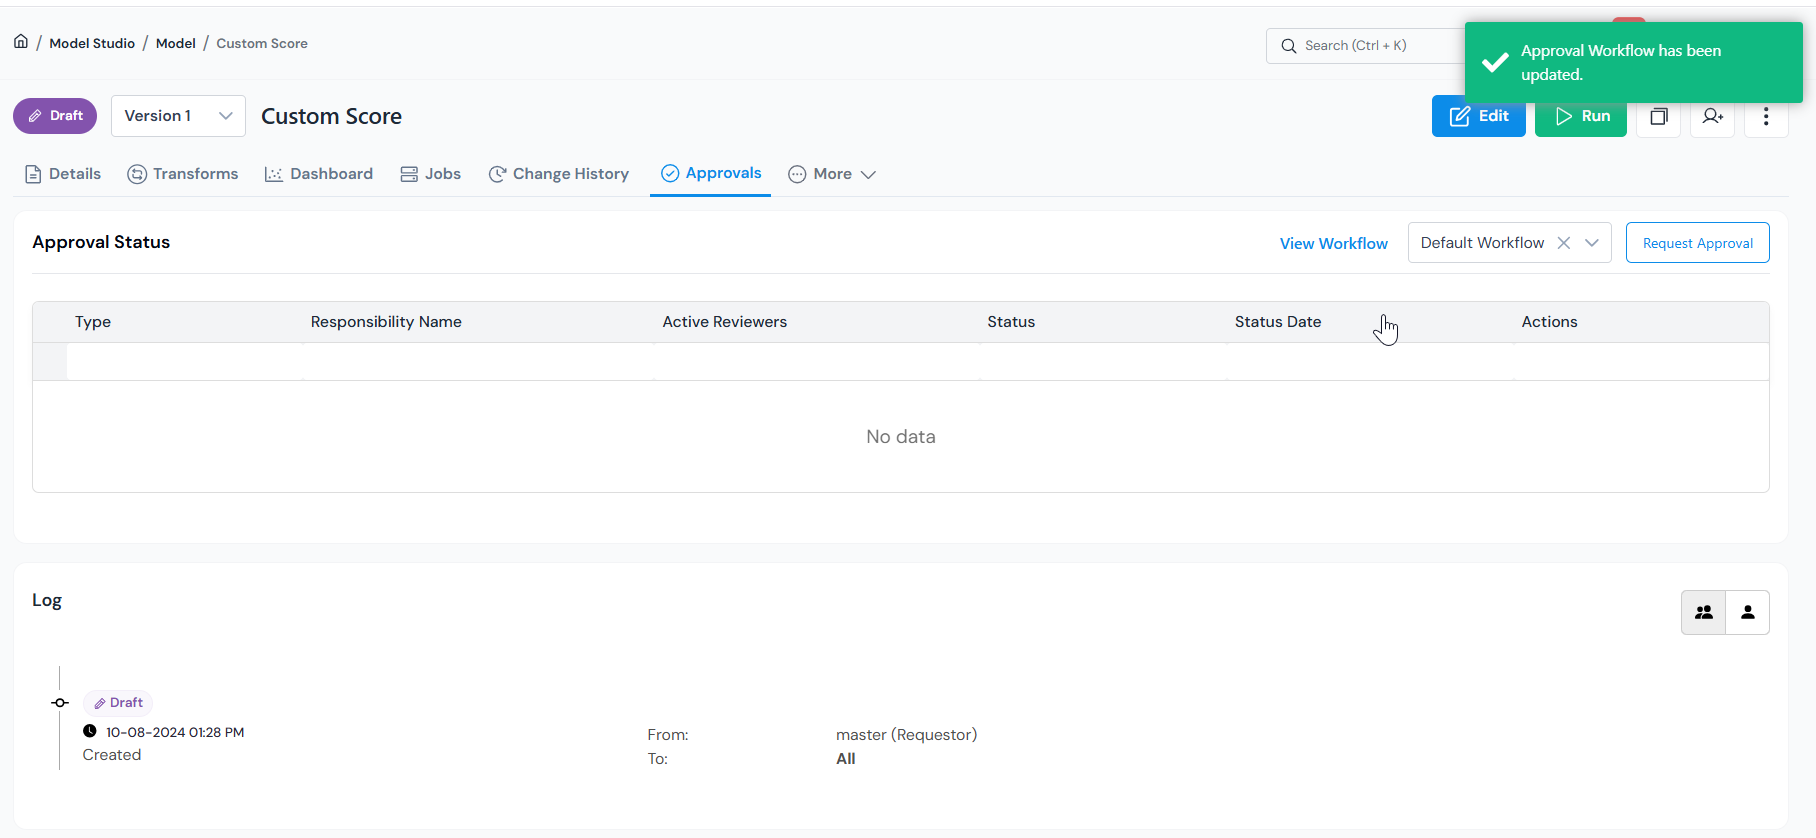
If the tab shows **Approval Workflow Not Selected**, pick a workflow from the *"Type or search for Approval Workflow"* dropdown. The dropdown next to **Request Approval** also lets you switch workflows later if more than one is configured for this object type.

Once a workflow is selected, the Approval Status table appears with **View Workflow** and **Request Approval** at the top right. Click **Request Approval** to open the form.

<figure>
  <img src="/images/how-tos/approve-an-object/send-approval-request-04-workflow-selected.png" alt="Approvals tab with a workflow selected, showing View Workflow and Request Approval controls." class="screenshot" loading="lazy" />
  <figcaption>After selecting a workflow, use <strong>Request Approval</strong> to open the form, or <strong>View Workflow</strong> to inspect the responsibilities.</figcaption>
</figure>

<details>
<summary>What View Workflow shows (responsibilities reference)</summary>

Clicking **View Workflow** opens a dialog listing every responsibility (a review role such as Code Quality or MRM) on the selected workflow, with its **Veto Power** and **Editable** flags. In a sequential workflow, only the current sequence group can review at a time; later responsibilities activate automatically.

Example for `Model MRM Approval Workflow`:

<table class="attr-table">
  <thead>
    <tr><th>#</th><th>Responsibility</th><th>Veto Power</th><th>Editable</th></tr>
  </thead>
  <tbody>
    <tr><td class="field-cell">1</td><td>Code Quality</td><td>No</td><td>Yes</td></tr>
    <tr><td class="field-cell">2</td><td>Dev Team</td><td>No</td><td>Yes</td></tr>
    <tr><td class="field-cell">3</td><td>MRM</td><td>Yes</td><td>No</td></tr>
    <tr><td class="field-cell">4</td><td>Fair Lending</td><td>Yes</td><td>No</td></tr>
  </tbody>
</table>

Code Quality and Dev Team review without Veto and keep the object editable. MRM and Fair Lending hold Veto and lock editing once their review starts.

</details>

</details>

<details open class="step">
<summary>

#### Resolve the input check

</summary>

When you click **Request Approval**, the platform first checks every input the object depends on:

<table class="attr-table">
  <thead>
    <tr>
      <th style="width: 28%;">Input state</th>
      <th>What happens</th>
    </tr>
  </thead>
  <tbody>
    <tr>
      <td class="field-cell">All inputs Approved</td>
      <td>The request form opens directly. Continue to <strong>Fill in the Request Approval form</strong> below.</td>
    </tr>
    <tr>
      <td class="field-cell">Some inputs in Draft</td>
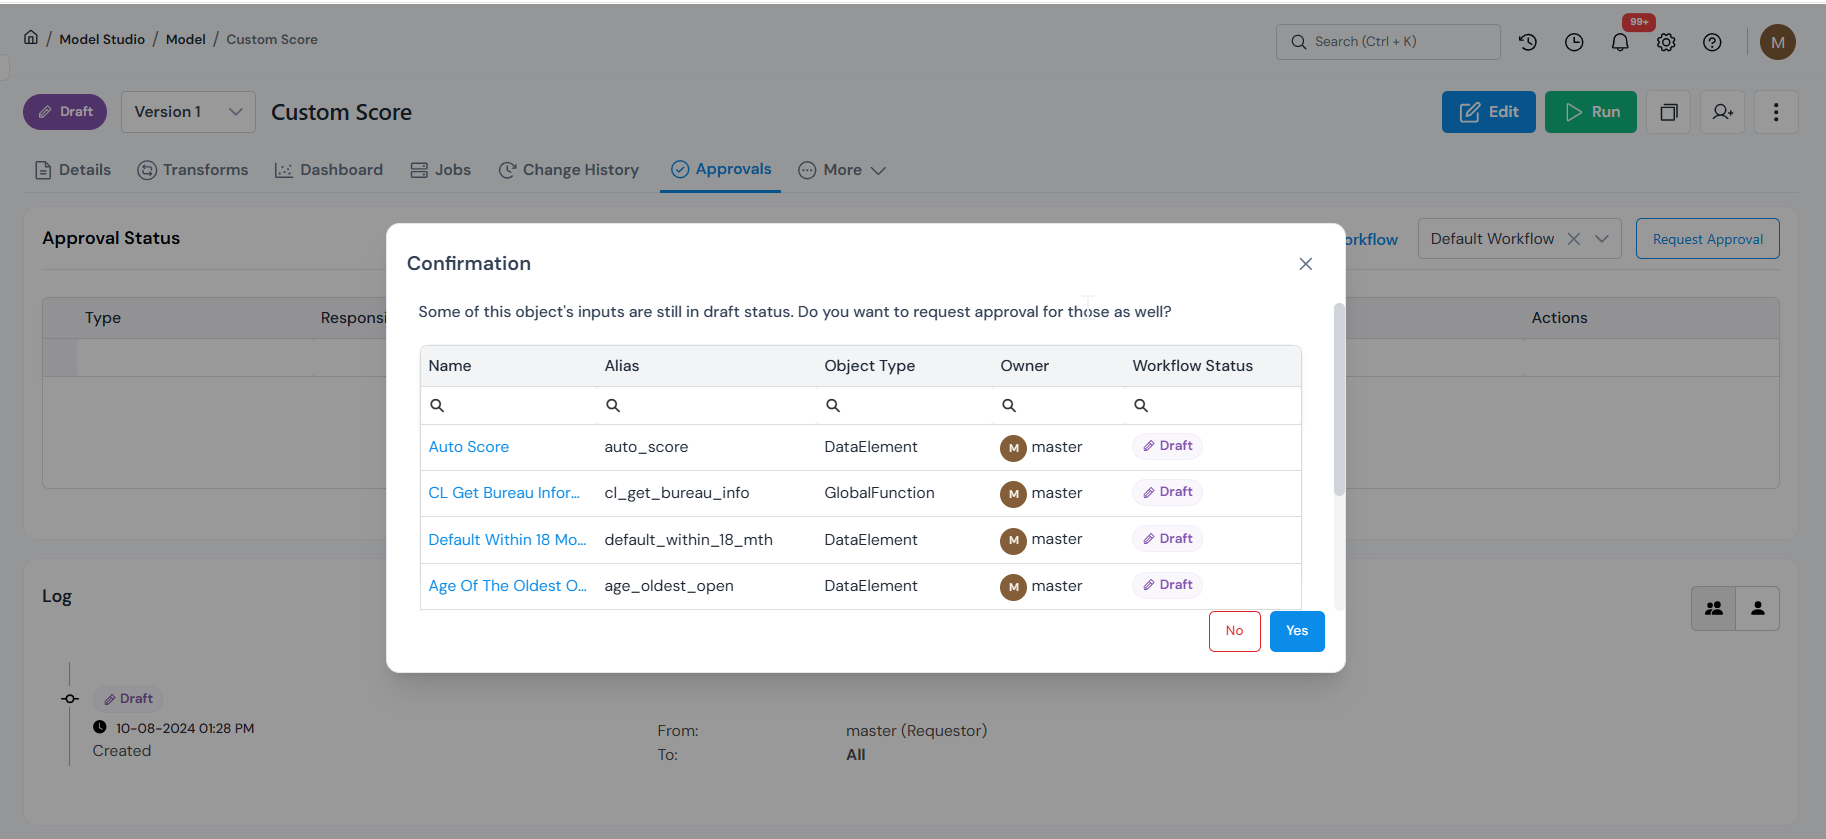
      <td>A dialog asks whether to bundle the draft inputs into the same request (<strong>group approval</strong>, see below). Click <strong>Yes</strong> to include them. You cannot skip the draft inputs and send only the main object: get each draft input approved on its own first, or group them into this request.</td>
    </tr>
    <tr>
      <td class="field-cell">Some inputs in Pending Approval</td>
      <td>You cannot continue. The dialog lists each blocking input; wait for those requests to finish or cancel them, then try again.</td>
    </tr>
  </tbody>
</table>

<figure>
  <img src="/images/how-tos/approve-an-object/send-approval-request-05-draft-inputs-dialog.png" alt="Confirmation dialog listing the object's draft inputs with Yes and No buttons." class="screenshot" loading="lazy" />
  <figcaption>When inputs are still in Draft, choose <strong>Yes</strong> to bundle them into this request. The draft inputs must be approved with it, either grouped here or approved on their own first.</figcaption>
</figure>

<details>
<summary>How group approval works (bundling draft inputs)</summary>

**Group approval** bundles the main object and its draft inputs into a single request, so reviewers sign off on all of them together instead of one at a time.

If you click **Yes** in the Draft inputs dialog, the main object and its draft inputs are bundled into one request.

* Reviewers make their decision on the main object's Approvals tab; that decision applies to every bundled input.
* Before accepting, the reviewer must tick the checkbox next to each bundled input. Leaving any unchecked makes the action fail.
* The main object's approval history lists every bundled input. After approval, each bundled input's Approvals tab shows a reference link back to the main object.

</details>

</details>

<details open class="step">
<summary>

#### Fill in the Request Approval form

</summary>

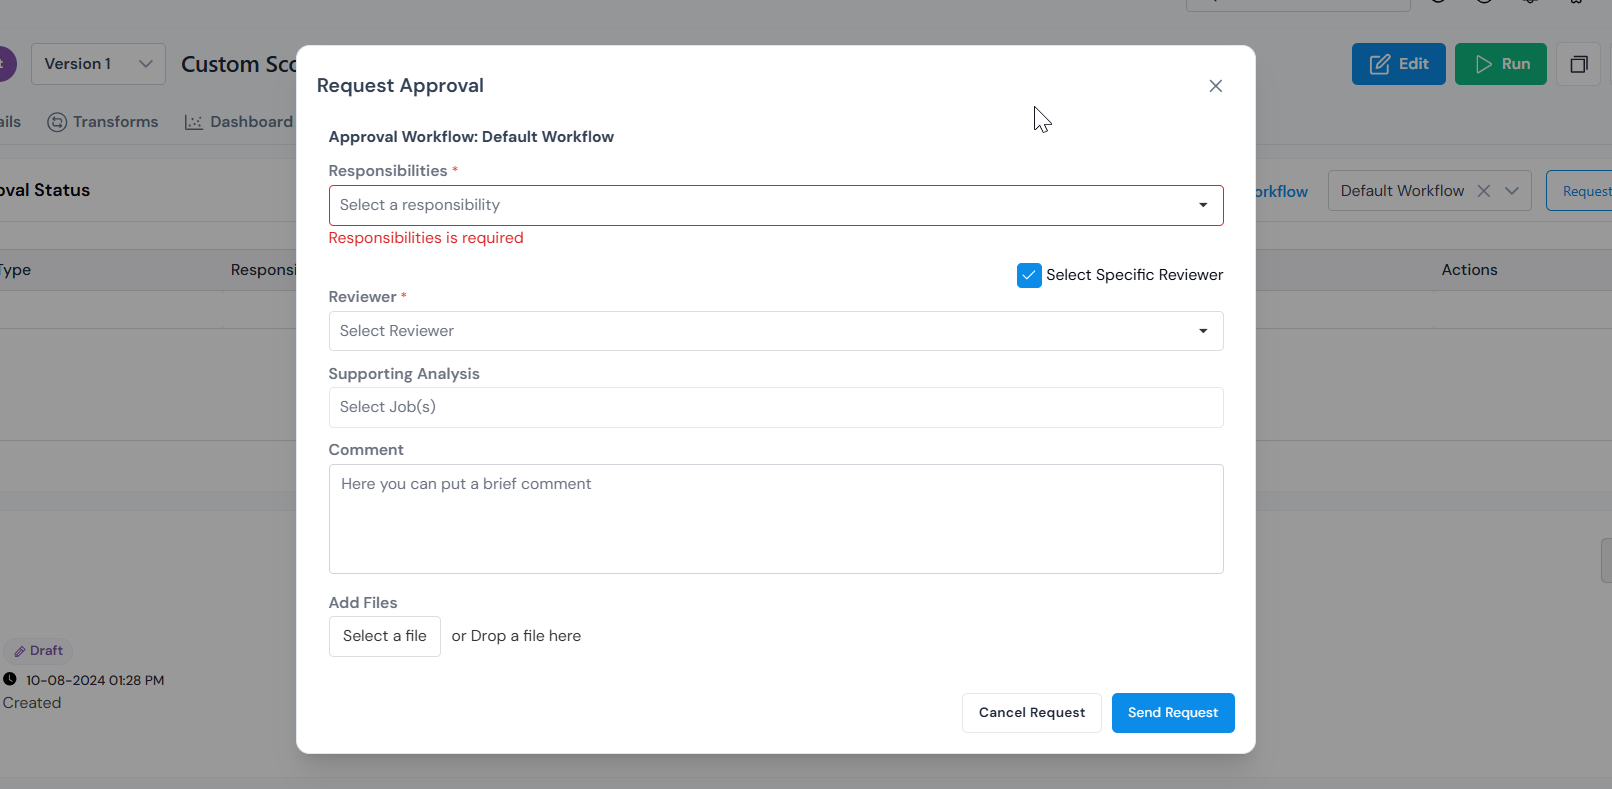
The form is titled **Request Approval** and shows the chosen Approval Workflow as a read-only header (for example, *Approval Workflow: Model MRM Approval Workflow*).

:::note[One request per responsibility]
Send one request for each review role (responsibility) on the workflow: fill in the form and click **Send Request**, then repeat for the next one. In parallel workflows you can send them in any order; in sequential workflows only the current sequence group is open and the next group unlocks automatically.
:::

<figure>
  <img src="/images/how-tos/approve-an-object/send-approval-request-06-form-empty.png" alt="Empty Request Approval form showing Responsibilities, Reviewer, Supporting Analysis, Comment, and Add Files fields." class="screenshot" loading="lazy" />
  <figcaption>The Request Approval form. The selected workflow appears as a read-only header above the fields.</figcaption>
</figure>

First, choose who reviews this request:

* Under **Select a Responsibility** (required), pick one responsibility from the workflow, for example Code Quality or MRM. Each request targets one responsibility.
* **Select Specific Reviewer** is a checkbox above the Reviewer dropdown. Left **on** (the default), you pick one user under **Reviewer** (required) and only that user is notified and can act. Turned **off**, every reviewer assigned to the responsibility is notified, and any of them can act.

</details>

<details open class="step">
<summary>

#### Attach evidence and send

</summary>

Next, attach the evidence reviewers see and send the request:

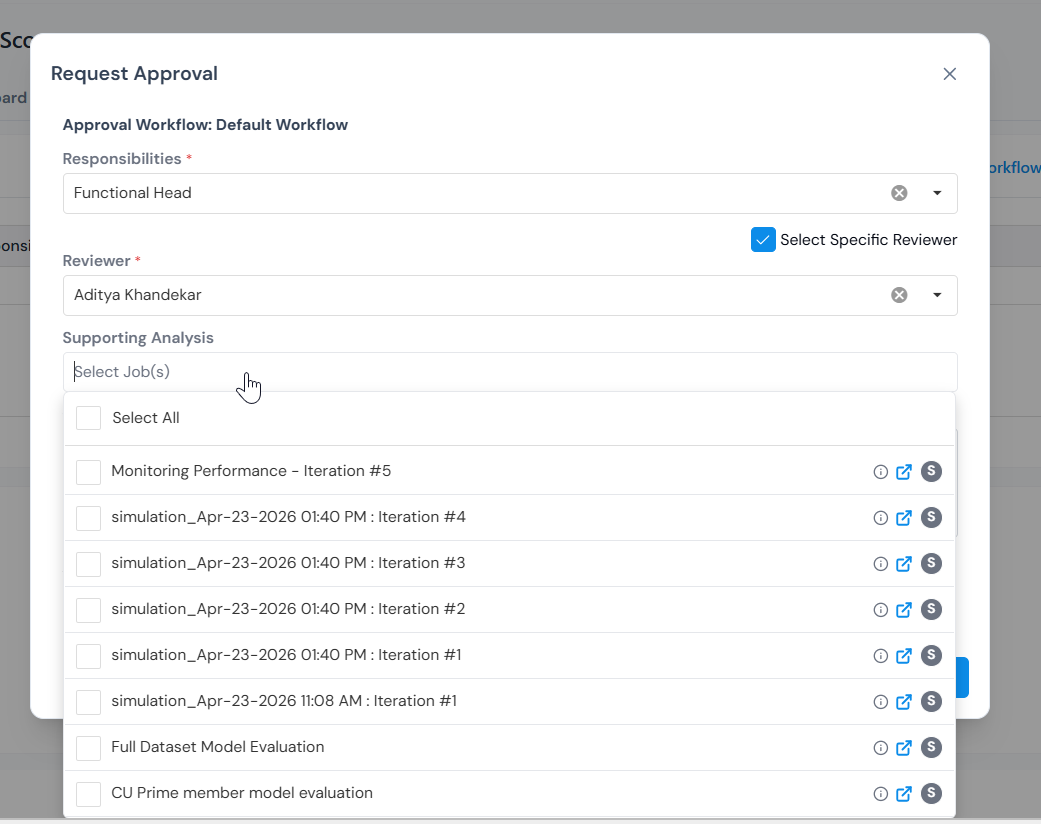
* Under **Supporting Analysis** (required), pick one or more simulations that have been run on this object. Once the request is approved, every attached job is marked verified. Admins can make this optional in **Settings**.
* Add an optional **Comment**, a free-form note for the reviewer.
* Under **Add Files**, drag a file into the drop zone or click **Select a file** to upload any supporting attachments.

<figure>
  <img src="/images/how-tos/approve-an-object/send-approval-request-07-supporting-analysis.png" alt="Supporting Analysis dropdown open, listing simulations that can be attached as evidence." class="screenshot" loading="lazy" />
  <figcaption>Under <strong>Supporting Analysis</strong>, pick one or more simulations run on this object as evidence for the reviewer.</figcaption>
</figure>

<figure>
  <img src="/images/how-tos/approve-an-object/send-approval-request-08-form-filled.png" alt="Completed Request Approval form with a responsibility, reviewer, attached simulation, comment, and file." class="screenshot" loading="lazy" />
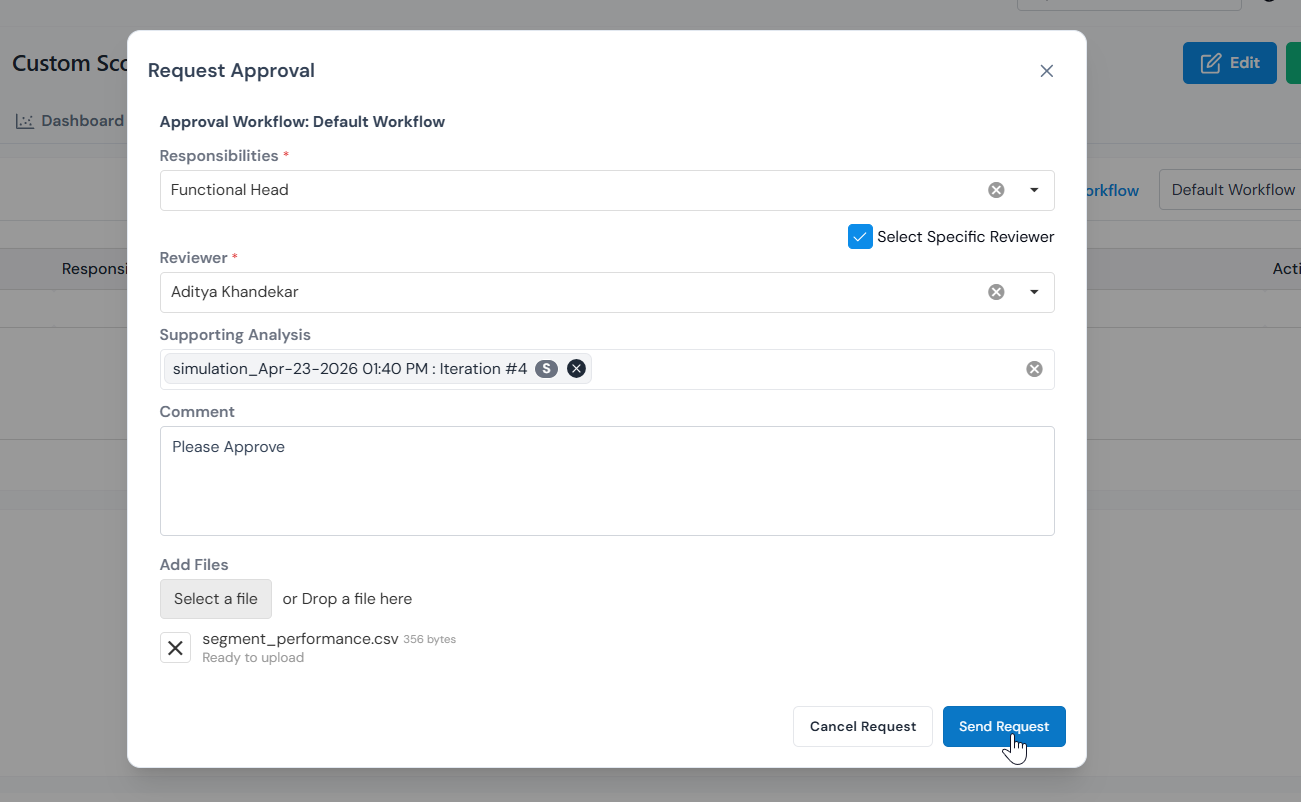
  <figcaption>A completed request: responsibility, reviewer, supporting analysis, comment, and an optional attached file.</figcaption>
</figure>

Click **Send Request** to submit, or **Cancel Request** to back out. Reviewers are notified by email, in-app, or both, depending on what your Platform Admin has configured.

</details>

## After you submit: tracking the request

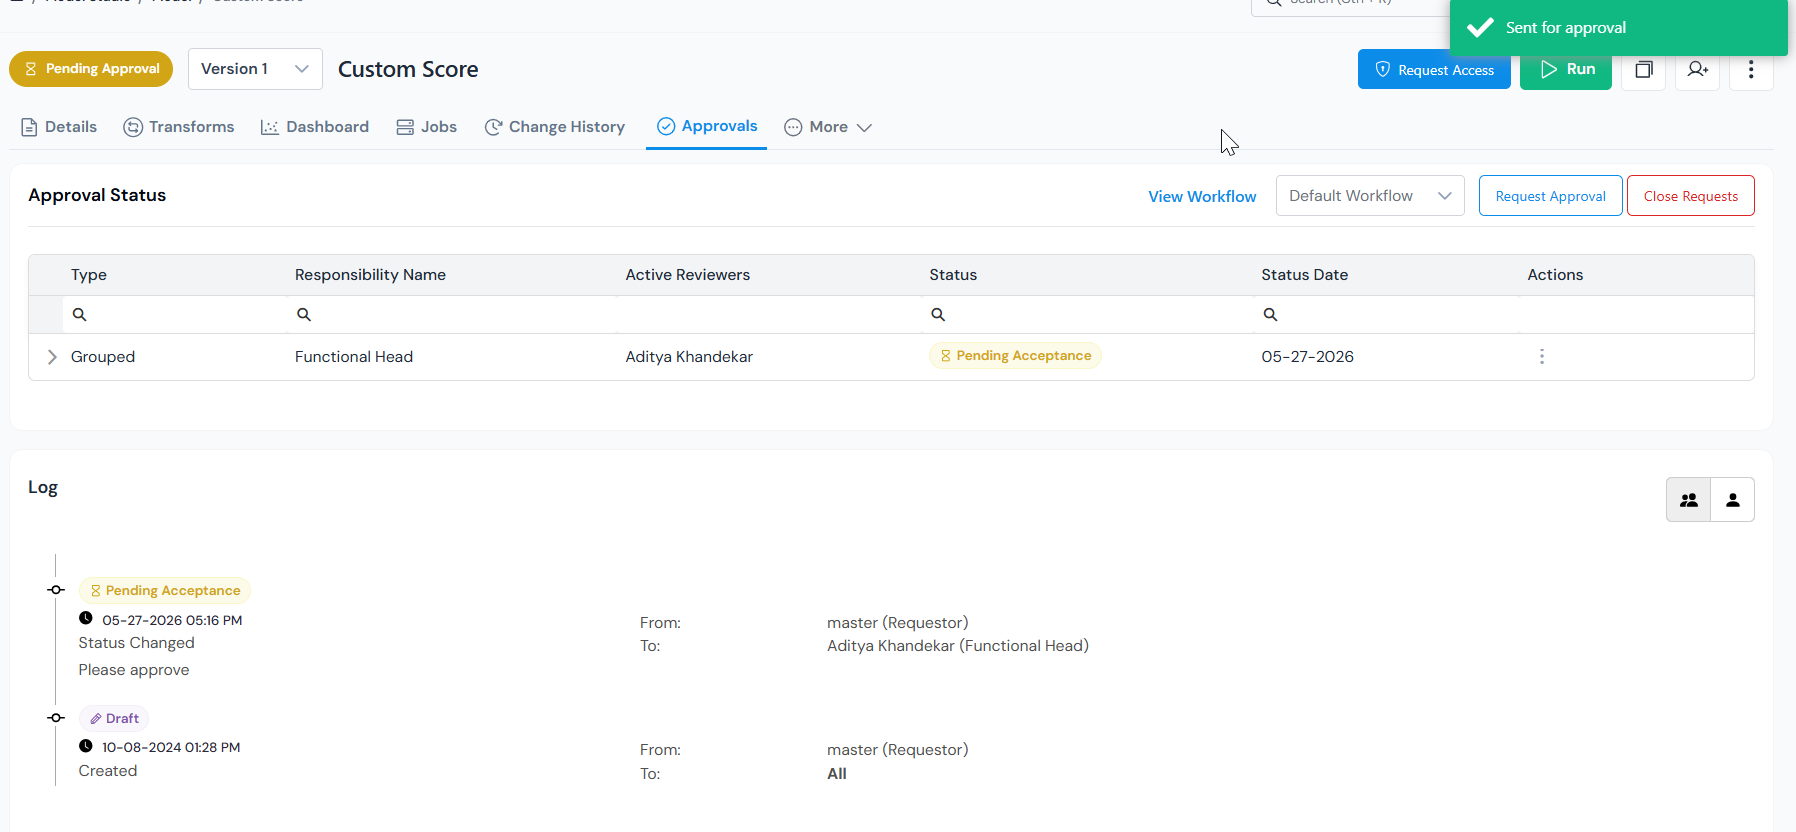
Once submitted, the object moves to **Pending Approval** and the **Approvals** tab becomes your home base. It has two parts.

<figure>
  <img src="/images/how-tos/approve-an-object/send-approval-request-09-pending-approval.png" alt="Approvals tab in Pending Approval state with one request row and the Log timeline below." class="screenshot" loading="lazy" />
  <figcaption>After the first request, the object status changes to <strong>Pending Approval</strong> and the request appears in the Approval Status table.</figcaption>
</figure>

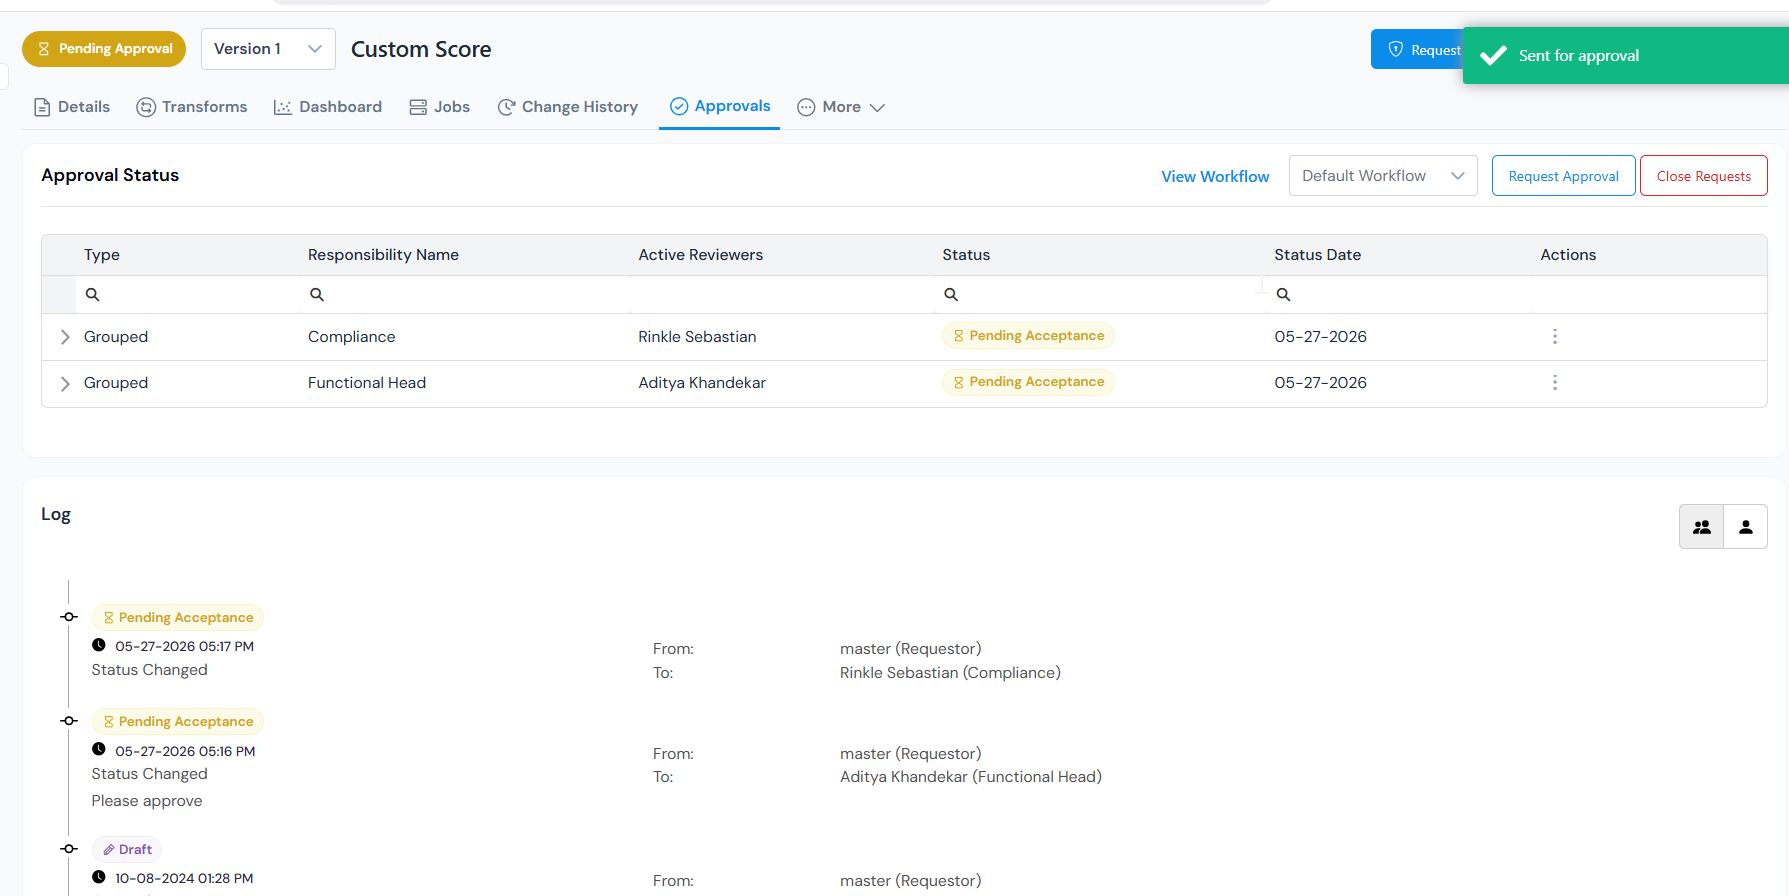
**Approval Status table** (top): one row per submitted request.

<table class="attr-table">
  <thead>
    <tr>
      <th style="width: 22%;">Column</th>
      <th>Shows</th>
    </tr>
  </thead>
  <tbody>
    <tr>
      <td class="field-cell">Type</td>
      <td>The Approval Workflow row, or a bundled input under group approval.</td>
    </tr>
    <tr>
      <td class="field-cell">Responsibility Name</td>
      <td>The responsibility this request targets.</td>
    </tr>
    <tr>
      <td class="field-cell">Active Reviewers</td>
      <td>The user(s) who can act on this row.</td>
    </tr>
    <tr>
      <td class="field-cell">Status</td>
      <td><strong>Pending Acceptance</strong>, <strong>Accepted</strong>, <strong>Rejected</strong>, <strong>Need Change</strong>, <strong>Need Info</strong>, or <strong>Canceled</strong>.</td>
    </tr>
    <tr>
      <td class="field-cell">Status Date</td>
      <td>When the row last changed.</td>
    </tr>
    <tr>
      <td class="field-cell">Actions</td>
      <td>Three-dot menu, see below.</td>
    </tr>
  </tbody>
</table>

**Log** (bottom): a read-only, chronological audit trail of every state change. Each entry records the event, timestamp, **From** and **To** (who initiated and where it was directed), the resulting state, and an optional comment.

<figure>
  <img src="/images/how-tos/approve-an-object/send-approval-request-10-multiple-responsibilities.png" alt="Approval Status table with two responsibility rows, each Pending Acceptance with its own reviewer." class="screenshot" loading="lazy" />
  <figcaption>Each responsibility is a separate request: submit once per responsibility, and each gets its own row and reviewer.</figcaption>
</figure>

### Can you keep editing during review?

<table class="attr-table">
  <thead>
    <tr>
      <th style="width: 45%;">Responsibility setup</th>
      <th>Editing during review</th>
    </tr>
  </thead>
  <tbody>
    <tr>
      <td class="field-cell">Any responsibility has Veto Power</td>
      <td>Locked until all decisions are made.</td>
    </tr>
    <tr>
      <td class="field-cell">All responsibilities are non-Veto and marked Editable</td>
      <td>Stays editable.</td>
    </tr>
  </tbody>
</table>

### Actions while pending

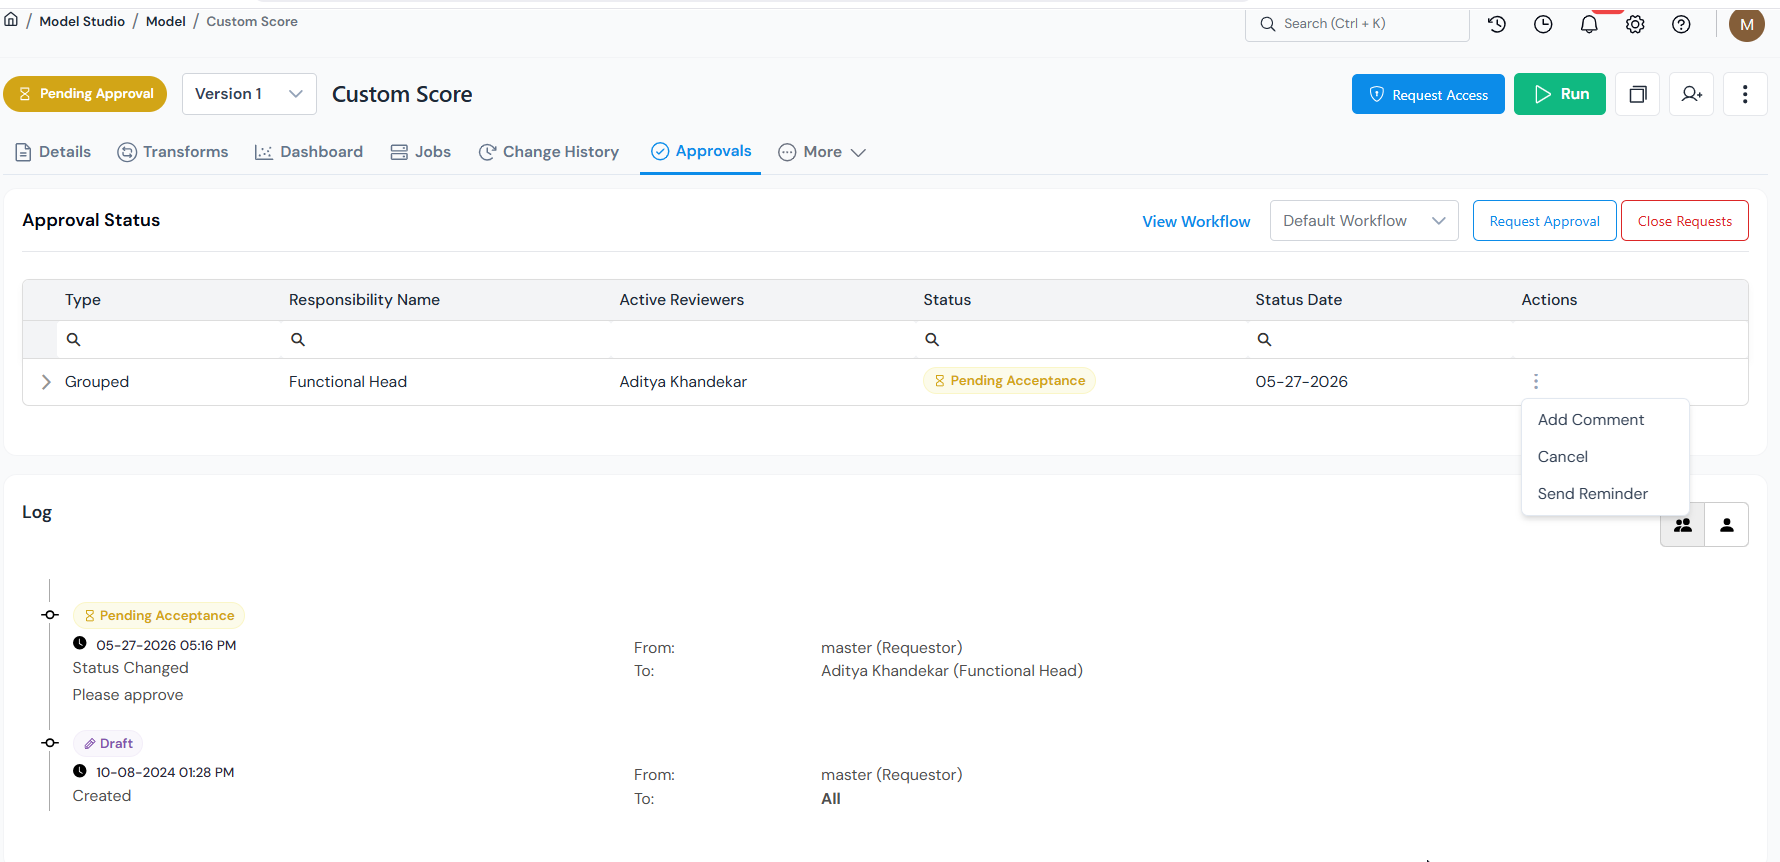
From the three-dot menu on each row:

* **Add Comment**: leave a note for the reviewer.
* **Send Reminder**: nudge a slow reviewer.
* **Cancel**: cancel only that responsibility's review (a reason is required). Other rows are unaffected.

<figure>
  <img src="/images/how-tos/approve-an-object/send-approval-request-11-row-actions-menu.png" alt="Three-dot Actions menu open on a request row, showing Add Comment, Cancel, and Send Reminder." class="screenshot" loading="lazy" />
  <figcaption>The three-dot menu on each row offers Add Comment, Cancel, and Send Reminder.</figcaption>
</figure>

Above the table:

* **Close Requests**: cancels every open review on the object and moves it back to **Draft**. Use this to stop the whole approval process and resume editing.

## Outcomes: what each reviewer status means

Each row in the Approval Status table reaches one of these states. **Final decisions** close the review for that responsibility:

<table class="attr-table">
  <thead>
    <tr>
      <th style="width: 22%;">Status</th>
      <th>What it means and what you do</th>
    </tr>
  </thead>
  <tbody>
    <tr>
      <td class="field-cell">Accepted</td>
      <td>This responsibility has signed off. When every responsibility is Accepted, the object becomes <strong>Approved</strong>.</td>
    </tr>
    <tr>
      <td class="field-cell">Rejected</td>
      <td>If the responsibility has Veto Power, the whole request is rejected immediately. By default, any rejection results in rejection. Clone the object to start a new version.</td>
    </tr>
  </tbody>
</table>

**Interim statuses** mean the reviewer needs something back from you:

<table class="attr-table">
  <thead>
    <tr>
      <th style="width: 22%;">Status</th>
      <th>What it means and what you do</th>
    </tr>
  </thead>
  <tbody>
    <tr>
      <td class="field-cell">Need Change</td>
      <td>The reviewer wants edits. Make the changes and <strong>Resubmit</strong> (see below).</td>
    </tr>
    <tr>
      <td class="field-cell">Need Info</td>
      <td>The reviewer wants more information (a fresh simulation, a comment, an attachment). Provide it and <strong>Resubmit</strong>.</td>
    </tr>
  </tbody>
</table>

### Resubmitting after Need Change or Need Info

1. Open the **Approvals** tab.
2. From the **Actions** menu on the relevant row, select **Resubmit**.
3. Attach a new simulation as Supporting Analysis if the reviewer asked for one.
4. Click **Send Request**.

The row goes back to **Pending Acceptance** and the object stays in **Pending Approval** throughout.

### Once everything is Accepted

* The object's status becomes **Approved**.
* Other objects can now reference it as an input.
* The version is locked. Any further change creates a new version, which must go through approval again.

## Retire an object

When an object is no longer meant to be used, **Retire** takes it out of service. Only an object in a final status can be retired: **Approved**, or (for policies) **Active** or **Shadow**. The action is permanent.

1. Open the object, and from its three-dot menu select **Retire**.
2. In the confirmation modal, add a comment. If the object has more than one approved version, tick **Retire all versions** to retire every approved version under it at once.
3. Click **Retire**. The object's status becomes **Retired**.

:::caution
Retiring cannot be undone. There is no un-retire; to work from a retired object again, clone it into a new Draft version.
:::

A retired object can still be **cloned, copied, and simulated** (including side-by-side comparison against other jobs), so you keep access to its definition and history.

Once you retire an object, the platform enforces that:

* A retired object cannot be selected as an input when you register or edit another object.
* If an object already has a retired input anywhere in its lineage, you cannot request approval for it and reviewers cannot accept it until the retired input is replaced.

:::note[Retire permission]
You need the **Retire** permission to retire an object. If you don't have it, the **Retire** button is grayed out. A Platform Admin grants it by adding your role to **Roles with Retire Permission** under [**Settings → Platform Settings → Governance**](/user-guide/admin-guide/configure-platform-settings/#governance).
:::

## What's next

* **For modelers**: once your model or policy is approved, see [Monitor your Model or Policy](/user-guide/how-tos/monitor-model-policy/) to track its performance in production.
* **For admins**: setting up the workflows themselves (responsibilities, reviewers, veto, sequence) is covered in [Configure an Approval Workflow](/user-guide/admin-guide/configure-approval-workflow/).