---
title: "Register a Table"
description: "Register a source data table as the starting point for everything you build on Corridor."
---

<div style="padding: 14px 16px; border: 0.5px solid #AFA9EC; border-radius: 12px; background: #EEEDFE; margin-bottom: 1.5rem;">
  <div style="display: flex; align-items: center; gap: 7px; margin-bottom: 8px;">
    <svg width="16" height="16" viewBox="0 0 16 16" fill="none">
      <path d="M9 2L4 9h4l-1 5 5-7H8l1-5z" stroke="#7f77dd" stroke-width="1.2" stroke-linecap="round" stroke-linejoin="round"/>
    </svg>
    <span style="font-size: 11px; font-weight: 500; letter-spacing: 0.05em; text-transform: uppercase; color: #534AB7;">TL;DR</span>
  </div>
  <div style="font-size: 13px; color: #3C3489; line-height: 1.65;">
    Register each source table your analytics will read from under <strong>Data Vault → Data Table</strong>. Fill in its details, fetch its columns, and set any keys that link it to other tables. Once registered, Corridor automatically tracks changes to the table and lets you run quality checks on it. Any object you later build off this table will also appear in its lineage.
  </div>
</div>

## What is it?

**Data Table** serves as the starting point of the platform, allowing you to register all data sources needed for analytics.

For example, if you plan to register and monitor a behavior score (a behavioral PD model on existing accounts) with the following structure, you must first register all tables the Model depends on.


<iframe src="/diagrams/register-a-table-lineage.html" title="Lineage from Behavior Score model down to source tables" loading="lazy" scrolling="no" style="width: 100%; max-width: 768px; aspect-ratio: 768 / 500; border: 0; display: block; margin: 1.5rem auto; overflow: hidden;"></iframe>

In this case, both the Account table and the Payment History table must be registered as Data Tables before proceeding with the Model registration.

### Benefits of a registered Data Table

- **Change history** is automatically recorded so every modification to the table is tracked.
- **Lineage** shows how the table is consumed across downstream Features, Models, and Policies.
- **Quality Checks** can be run on the table to verify data integrity.

### Entities, primary tables, and keys

A little background makes the form fields below much clearer. The steps further down use a running example of two entities, **Application** and **Account**, plus a secondary/detailed **Payment History** table under Account, to show how this works in practice.

<div style="padding: 16px 18px; border: 0.5px solid #AFA9EC; border-radius: 12px; background: #F6F5FE; margin: 1.25rem 0 1.5rem;">
  <div style="font-size: 14px; color: #2F2875; line-height: 1.7;">
    <p style="margin: 0 0 12px;"><strong>Entity</strong> - the thing a decision is made about, such as an Application, Customer, Account, or Prospect. For example, an <em>Application</em> is an entity that a credit file attaches to and that you approve or decline.</p>
    <p style="margin: 0 0 12px;"><strong>Primary table</strong> - the one table that holds the complete list of IDs for an entity (for example, every Account ID that exists). Each entity has <strong>exactly one</strong> primary table, which you mark with the <strong>Primary Table</strong> checkbox. Every other table for that entity is a <em>secondary/detailed</em> table that adds more columns about those same IDs.</p>
    <p style="margin: 0 0 12px;"><strong>Keys</strong> - how tables identify rows and link together. They are set up in Settings (for example <code>application_id</code>, <code>account_id</code>) and then attached to columns, which lets a column line up with the same key on another table. Each key you attach also takes a Constraint.</p>
    <p style="margin: 0;"><strong>Constraint</strong> - an independent property on the key: <strong>Primary</strong>, <strong>Unique</strong>, or <strong>None</strong>. <strong>Primary</strong> marks the entity's main identifier and is only available on primary tables. <strong>Unique</strong> states that the column's values never repeat. A column can also carry a key with <strong>None</strong> as its constraint.</p>
  </div>
</div>

## How to Register?

Follow these steps to register a Data Table.

<details open class="step">
<summary>

#### Open the Create Form

</summary>

On the **Data Vault → Data Table** page, click **+ New Data Table**.

A name prompt opens first. Enter a descriptive name for the table (for example, `Account Table`) and confirm to land on the full Data Table form.

</details>

<details open class="step">
<summary>

#### Fill in Attributes

</summary>

Fill in the standard metadata: an **Alias** (a short identifier such as `account_table`), a **Group** (a logical grouping for organising similar tables), and a **Description** of what the table contains.

Two fields need a decision:

- **Primary Table** - tick this only if the table holds the complete list of unique IDs for an entity (for example, every Account ID). Each entity can have only one primary table. Leave it unticked for a secondary/detailed table that simply adds more columns about those same IDs. See [Entities, primary tables, and keys](#entities-primary-tables-and-keys) above.
- **Input Source** - where the data lives and how the platform reads it, covered next.

<div class="example-box">
<span class="example-label">Example</span>

In our running scenario, the **Application** table and the **Account** table each list every ID for their entity, so both are ticked as primary tables. The **Payment History** table is left unticked: many cycles belong to one account, so it is a secondary/detailed table under the Account entity.

</div>

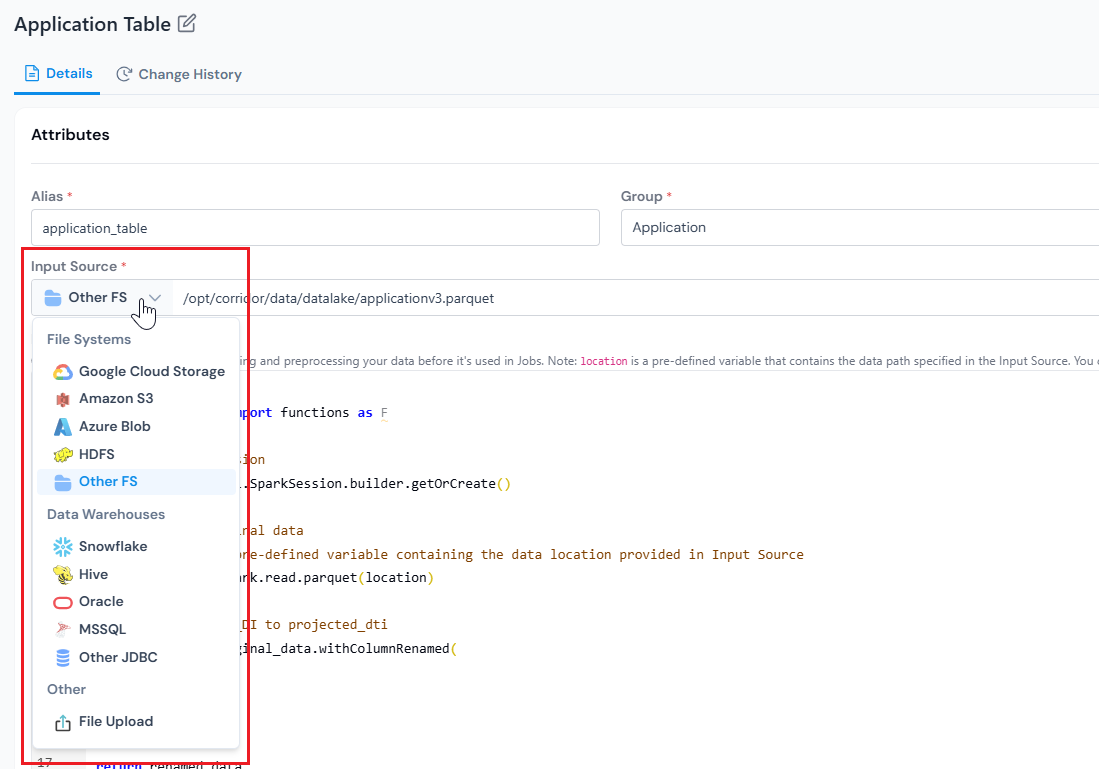
**Input Source.** This is where you tell the platform where to read the data from and, optionally, how to preprocess it before any job runs against this table.

Fill in:

1. **Location**: the path or connection string (for example, `hdfs://...`, `s3://...`, or a JDBC URL). For CSV, you can also upload a file directly instead of providing a path.
2. **Format**: Parquet (default), Hive, ORC, CSV, Snowflake, or JDBC.
<figure>
  <img src="/images/how-tos/register-a-table/register-a-table-04-input-source.png" alt="Input Source selector showing source types in the New Data Table form." class="screenshot" loading="lazy" />
  <figcaption>Choose the input source, or paste the input source location.</figcaption>
</figure>

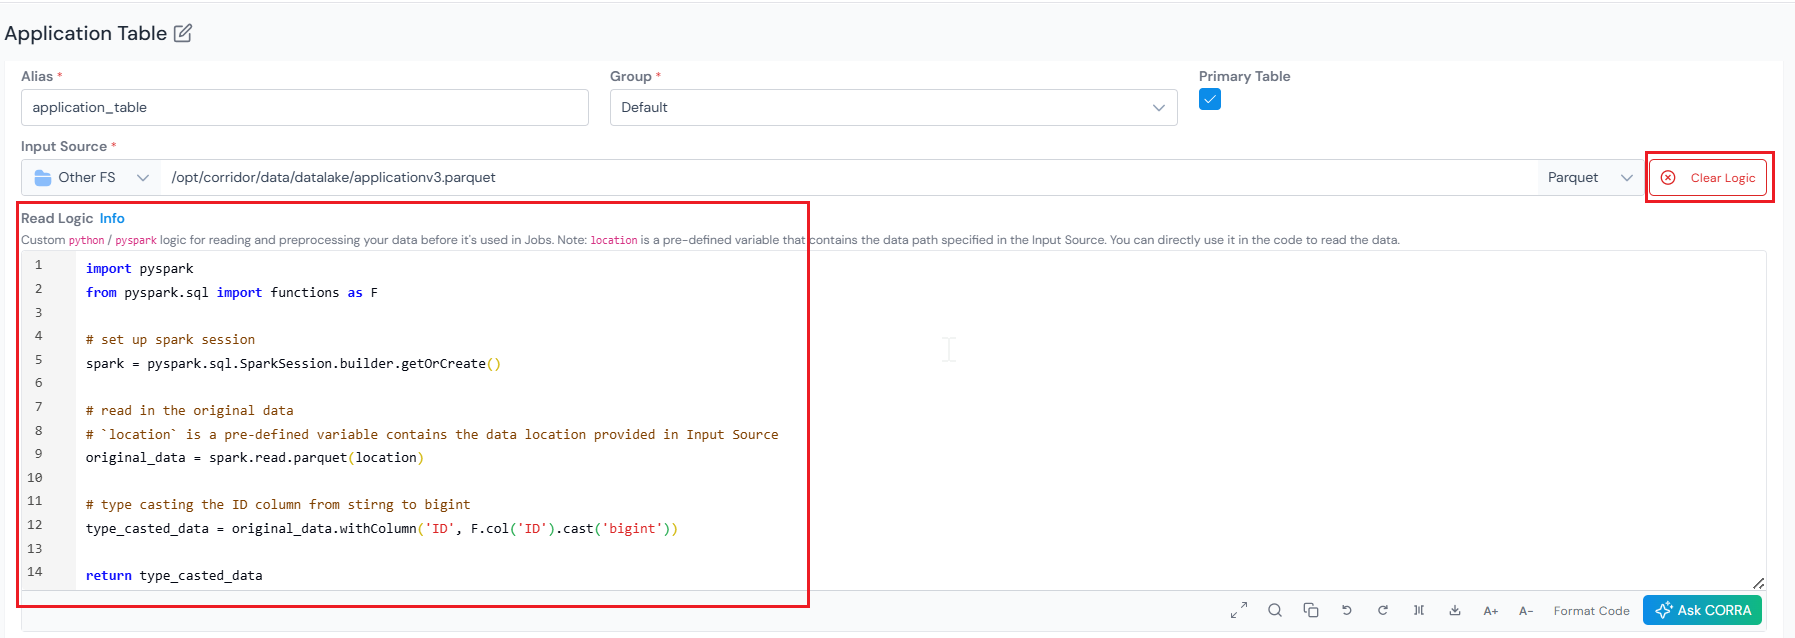
To optionally preprocess the data on top of the read, click **Add Logic** on the right of the Input Source row. See [Add Read Logic](#optional-add-read-logic).

</details>

<details class="step">
<summary>

#### (Optional) Add Read Logic

</summary>

Read Logic lets you define custom Python or PySpark logic to read and preprocess data before it is used in any job. 

Common use cases:

- **Type casting** specific columns (for example, `ID` from `string` to `bigint`).
- **Transforming column values** (string cleanup, normalising case, replacing nulls with defaults).
- **Merging multiple data sources** into a unified table (joining application data with bureau pulls).
- **Subsetting** to a relevant slice (for example, the last 10 years of data, or a specific product segment).

Inside the editor, `location` is a pre-defined variable that contains the path you entered in **Input Source**. Use it directly to read the data. Whatever object you `return` is the data the platform uses when running any job against this Data Table.

<figure>
  <img src="/images/how-tos/register-a-table/register-a-table-05-add-logic.png" alt="Add Logic editor in the New Data Table form with Clear Logic option." class="screenshot" loading="lazy" />
  <figcaption>The Read Logic editor lives next to Input Source. Use Clear Logic to drop back to a plain Location read.</figcaption>
</figure>

**Example 1: Typecast the `ID` column to `bigint`**

```python
import pyspark
from pyspark.sql import functions as F

# set up spark session
spark = pyspark.sql.SparkSession.builder.getOrCreate()

# read in the original data
# `location` is a pre-defined variable that contains the data location provided in Input Source
original_data = spark.read.parquet(location)

# type cast the ID column from string to bigint
type_casted_data = original_data.withColumn('ID', F.col('ID').cast('bigint'))

return type_casted_data
```

**Example 2: Merge an applications file with a bureau pull and keep only the last 10 years**

```python
import pyspark
from pyspark.sql import functions as F

spark = pyspark.sql.SparkSession.builder.getOrCreate()

# `location` points to the applications dataset configured in Input Source
applications = spark.read.parquet(location)

# read the bureau pull from its own absolute path
bureau = spark.read.parquet('s3://risk-data-prod/bureau/bureau_summary/')

# join on application_id, then keep only the last 10 years of applications
merged = applications.join(bureau, on='application_id', how='left')
recent = merged.where(F.col('application_date') >= F.add_months(F.current_date(), -120))

return recent
```

If you leave Read Logic empty, the platform reads the source directly using the format you selected.

</details>

<details open class="step">
<summary>

#### Create the Table

</summary>

Click **Create** at the bottom right. The Data Table is saved and you land on its details page, which has **Details** and **Change History** tabs.

</details>

<details open class="step">
<summary>

#### Fetch Columns

</summary>

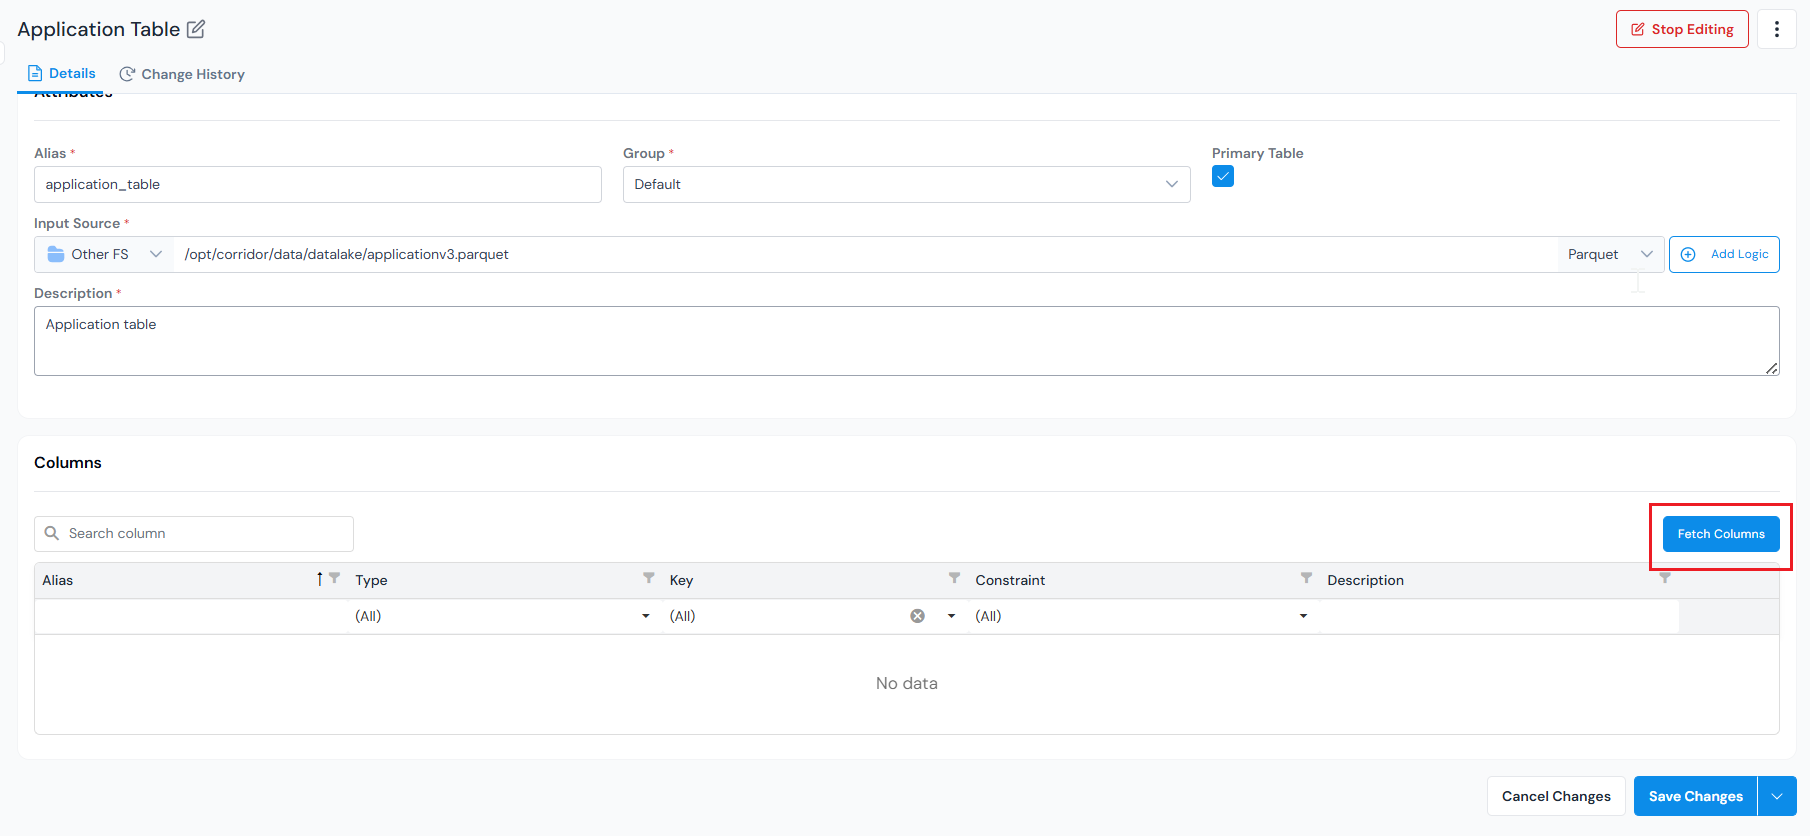
The table needs a little editing before it can be populated, so click **Edit**. Then fetch the table's columns from the source. They appear in the **Columns** section at the bottom of the Details tab.

<figure>
  <img src="/images/how-tos/register-a-table/register-a-table-07-fetch-columns.png" alt="Fetch Columns action on the Data Table details page." class="screenshot" loading="lazy" />
  <figcaption>Fetch Columns inspects the source (or runs your Read Logic) and pulls the schema into the registry.</figcaption>
</figure>

Each column's **Alias** and **Type** are auto-populated from the source, so most need no action. Only the columns you want to use as keys need attention. For those, you set two separate dropdowns, **Key** and **Constraint**:

- **Key** - the dropdown lists the keys already configured under Settings, so if a key was set up for another table you simply select it here. If the key you need does not exist yet, [configure a table key](/user-guide/admin-guide/configure-table-keys/) in Settings first, then choose it. Creating a table key may require admin access, so you might need to ask an admin. Leave this blank for ordinary data columns.
- **Constraint** - an independent property on that key. Choose **Primary** to mark the entity's main identifier (available only on primary tables), **Unique** if the column's values never repeat, or leave it as **None**.

It is also worth adding a short **Description** to each column, since it makes the table much easier to use later.

<div class="example-box">
<span class="example-label">Example</span>

On the **Account** primary table, give the ID column the `account_id` Key with the **Primary** Constraint. On the `application_id` column, set the `application_id` Key with the **None** Constraint to link each account back to its application.

On the **Payment History** secondary/detailed table, the `account_id` Key already exists in Settings (created for the Account table), so you just select it for the matching column to link each payment record to its account. Its Constraint stays **None** because `account_id` is not unique here, many payment records share one account, so it is a link, not an identifier. If a per-row identifier is needed, configure a `payment_id` Key in Settings, select it here, and set its Constraint to **Unique**.

</div>

Once you have reviewed the columns and saved your changes, each column is available in the registry and the Data Table appears in **Data Table**, ready to use downstream.

</details>

## What's Next

Once registered, the table is available in **Data Vault → Data Table** as part of the data catalog, ready to use in any downstream job.

- Register a [DataElement](/user-guide/how-tos/register-a-data-element/) to expose columns from this table for use across the platform.
- Open **Data Vault → Quality Profile** to run summary statistics (min, max, missing %) on any column from this table.
- See where tables fit in the broader flow in [Start with a Model](/getting-started/start-with-model/).