

Approve an Object
Ask AI
The same flow works for every object type (data elements, features, models, policies, global functions). Only the workflow and reviewers configured for that type may differ.
Before you start
Section titled “Before you start”- The object must be registered (saved as a draft).
- A simulation must be run on the object so it can be attached as evidence. Admins can make this optional in Settings, but it is required by default.
- An Approval Workflow must exist for that object type (for example, a workflow configured for Models). See Configure an Approval Workflow.
- You need edit access to the object. Anyone with edit access can submit it for approval.
The status flow at a glance
Section titled “The status flow at a glance”An object travels from Draft to Approved. When you request approval, the platform first checks the object’s inputs and routes accordingly: drafts can be grouped into the request, pending inputs must be resolved first, and fully approved inputs let the request go straight to Pending Approval.
From there each reviewer accepts, asks for changes, or vetoes. A veto sends the object to Rejected, which you clone to start a fresh Draft. The flowchart below maps every branch; the rest of this page walks through these in detail.
How to Send an Approval Request?
Section titled “How to Send an Approval Request?”Follow these steps to send an object for approval and track it to a decision.
Open the Approvals tab
Section titled “Open the Approvals tab”
Open the Approvals tab
Section titled “Open the Approvals tab”Open the object’s details page and click the Approvals tab.
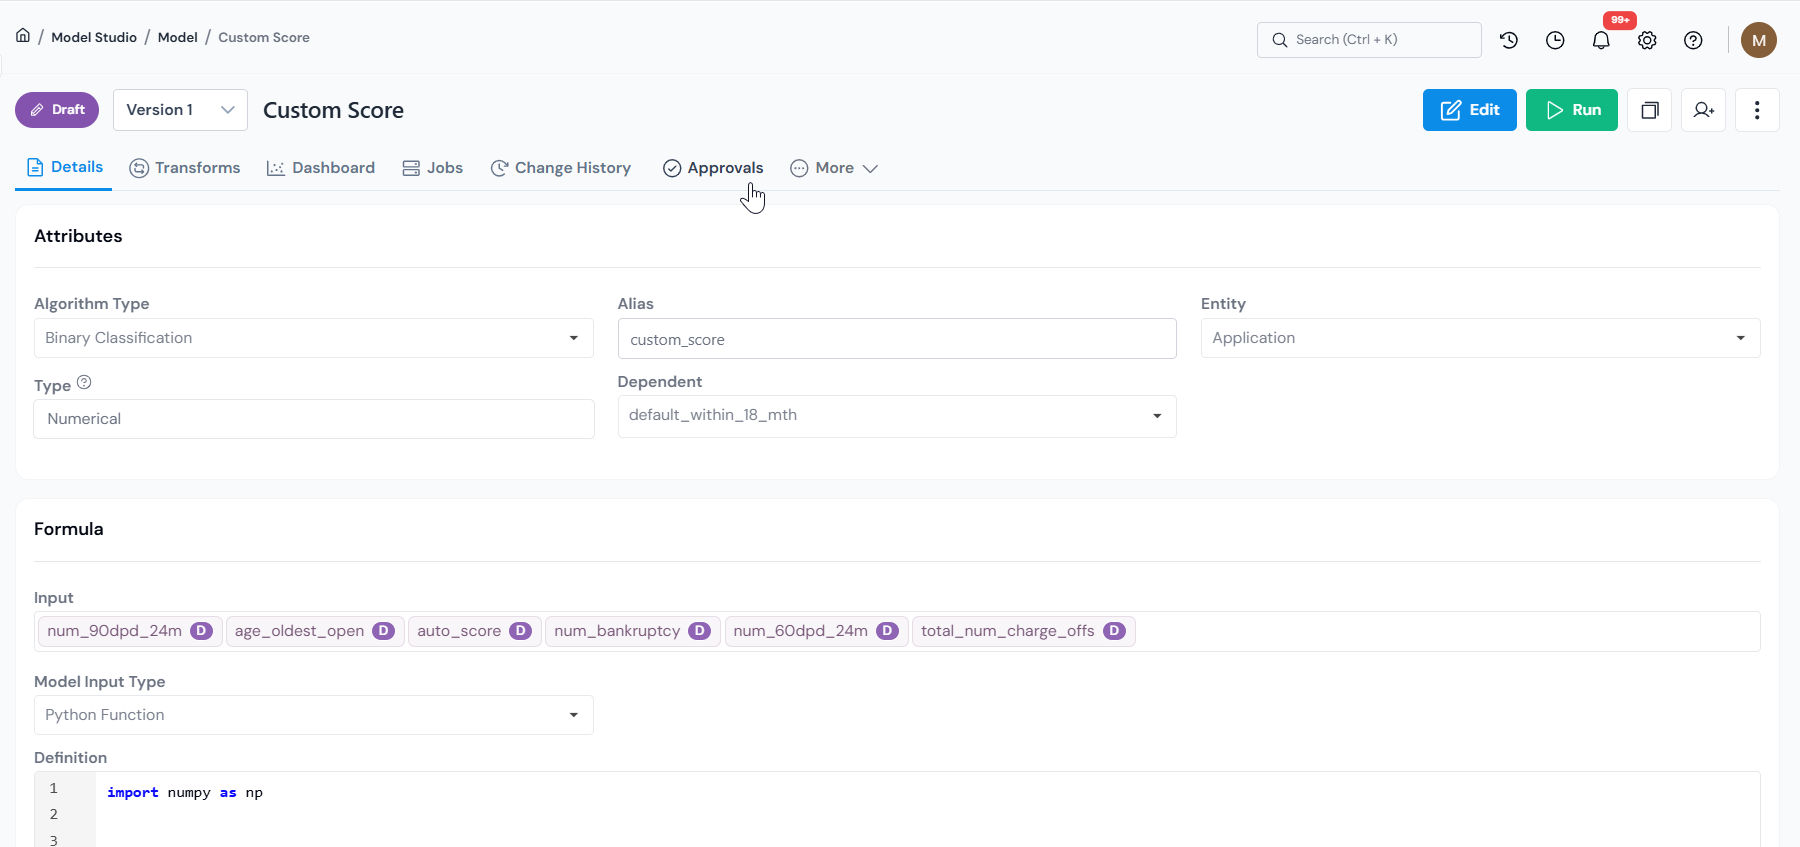
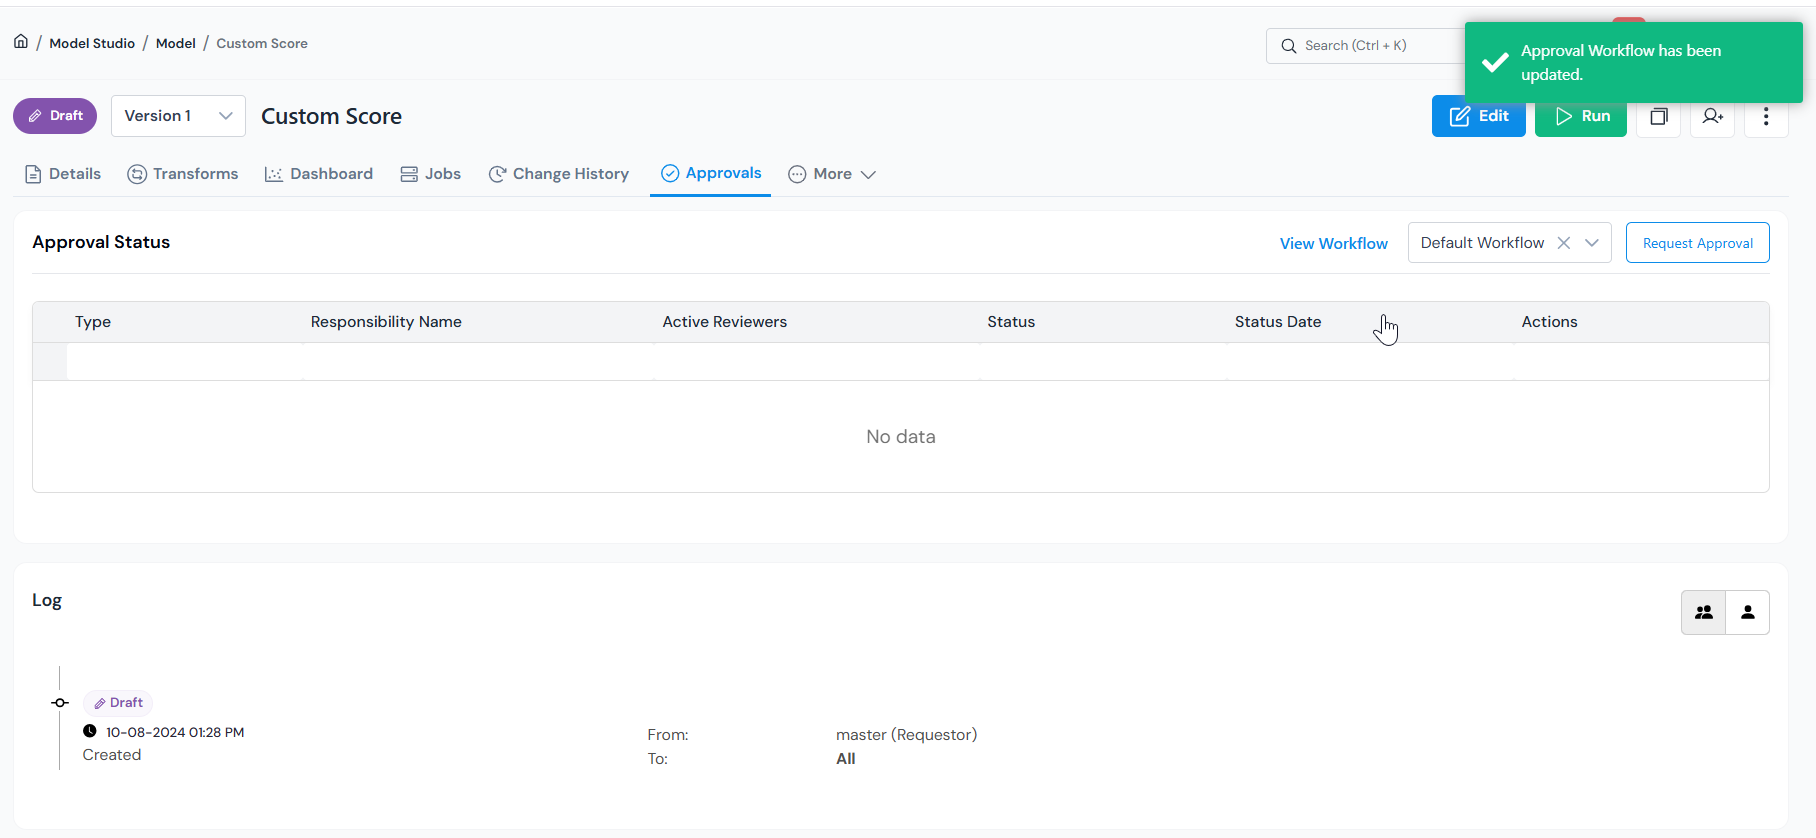
If the tab shows Approval Workflow Not Selected, pick a workflow from the “Type or search for Approval Workflow” dropdown. The dropdown next to Request Approval also lets you switch workflows later if more than one is configured for this object type.
Once a workflow is selected, the Approval Status table appears with View Workflow and Request Approval at the top right. Click Request Approval to open the form.
What View Workflow shows (responsibilities reference)
Clicking View Workflow opens a dialog listing every responsibility (a review role such as Code Quality or MRM) on the selected workflow, with its Veto Power and Editable flags. In a sequential workflow, only the current sequence group can review at a time; later responsibilities activate automatically.
Example for Model MRM Approval Workflow:
| # | Responsibility | Veto Power | Editable |
|---|---|---|---|
| 1 | Code Quality | No | Yes |
| 2 | Dev Team | No | Yes |
| 3 | MRM | Yes | No |
| 4 | Fair Lending | Yes | No |
Code Quality and Dev Team review without Veto and keep the object editable. MRM and Fair Lending hold Veto and lock editing once their review starts.
Resolve the input check
Section titled “Resolve the input check”
Resolve the input check
Section titled “Resolve the input check”When you click Request Approval, the platform first checks every input the object depends on:
| Input state | What happens |
|---|---|
| All inputs Approved | The request form opens directly. Continue to Fill in the Request Approval form below. |
| Some inputs in Draft | A dialog asks whether to bundle the draft inputs into the same request (group approval, see below). Click Yes to include them. You cannot skip the draft inputs and send only the main object: get each draft input approved on its own first, or group them into this request. |
| Some inputs in Pending Approval | You cannot continue. The dialog lists each blocking input; wait for those requests to finish or cancel them, then try again. |
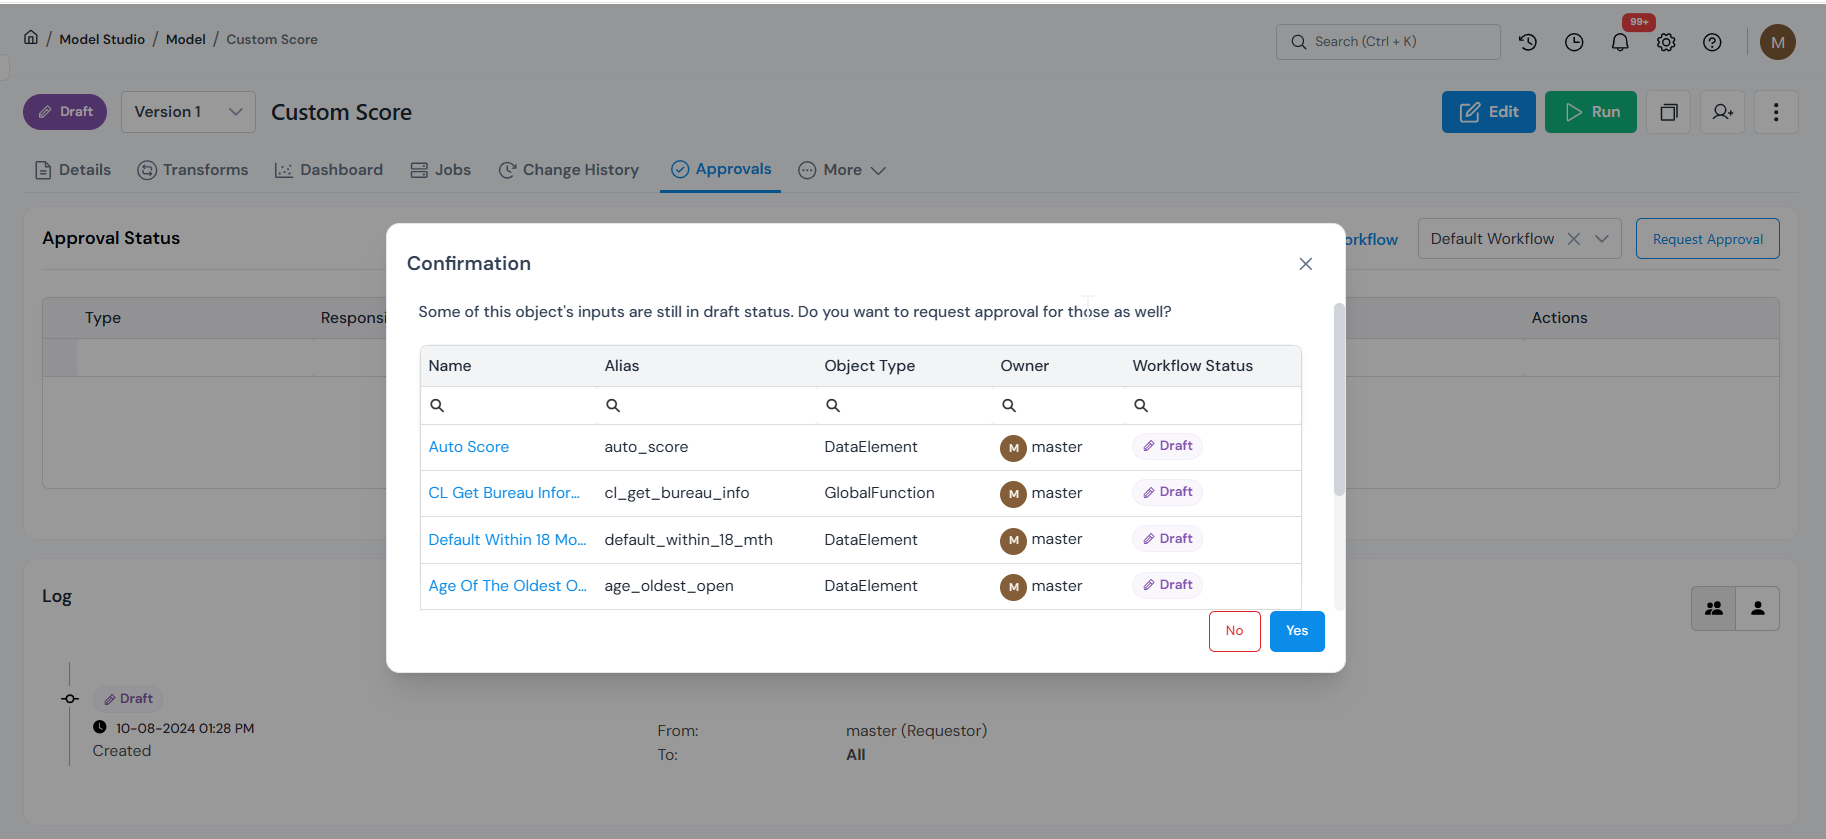
How group approval works (bundling draft inputs)
Group approval bundles the main object and its draft inputs into a single request, so reviewers sign off on all of them together instead of one at a time.
If you click Yes in the Draft inputs dialog, the main object and its draft inputs are bundled into one request.
- Reviewers make their decision on the main object’s Approvals tab; that decision applies to every bundled input.
- Before accepting, the reviewer must tick the checkbox next to each bundled input. Leaving any unchecked makes the action fail.
- The main object’s approval history lists every bundled input. After approval, each bundled input’s Approvals tab shows a reference link back to the main object.
Fill in the Request Approval form
Section titled “Fill in the Request Approval form”
Fill in the Request Approval form
Section titled “Fill in the Request Approval form”The form is titled Request Approval and shows the chosen Approval Workflow as a read-only header (for example, Approval Workflow: Model MRM Approval Workflow).
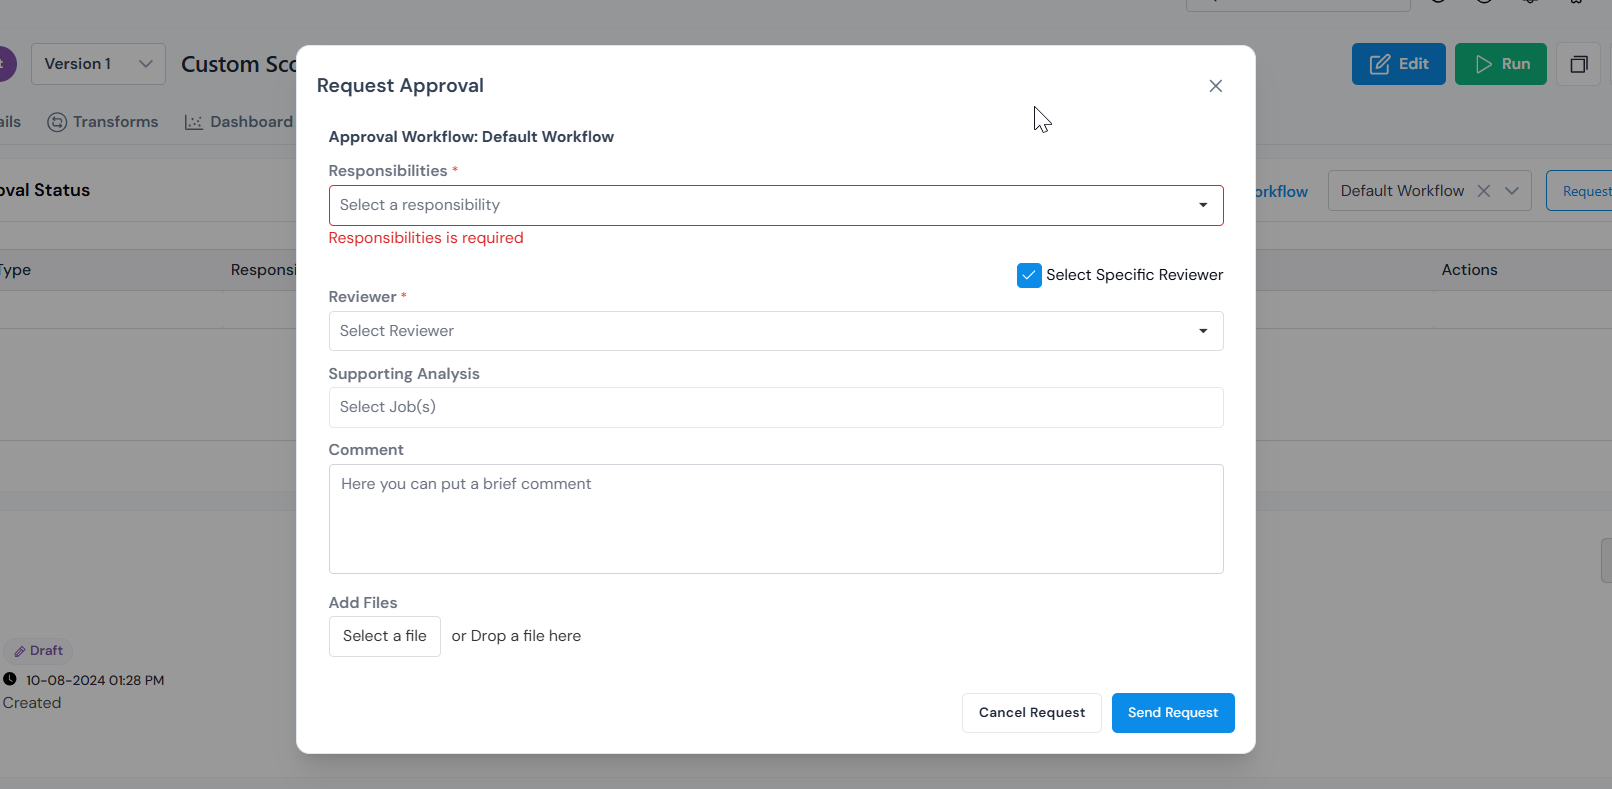
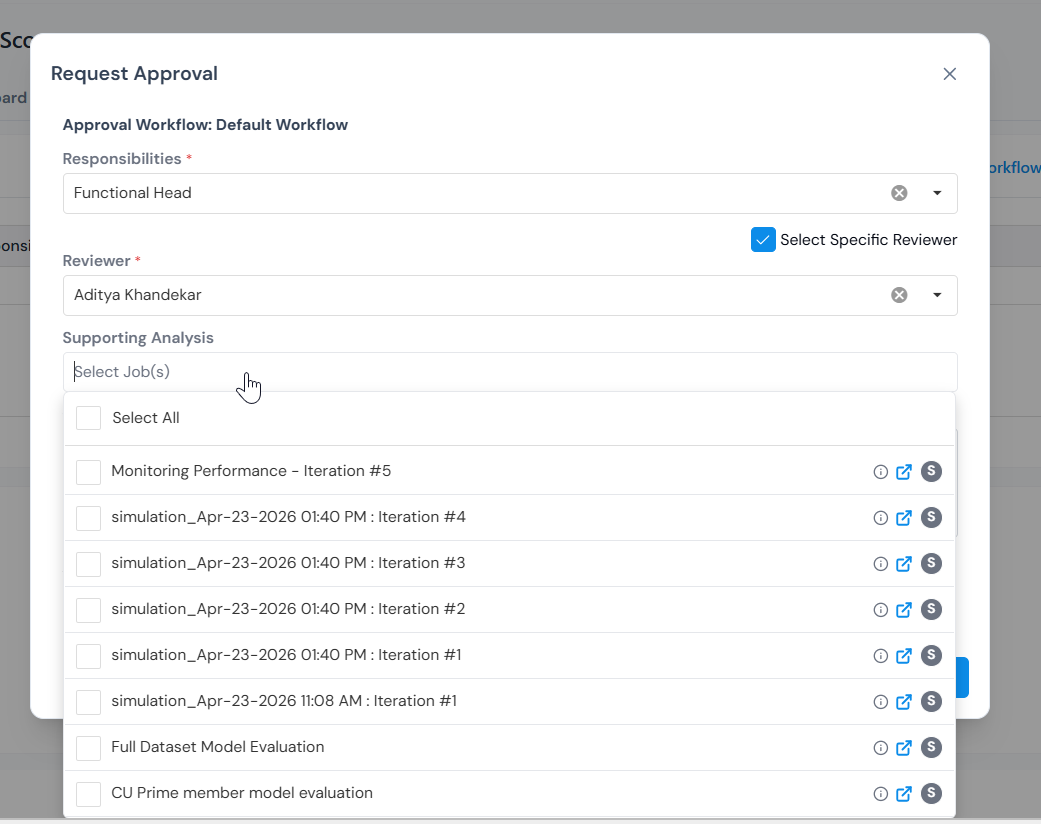
First, choose who reviews this request:
- Under Select a Responsibility (required), pick one responsibility from the workflow, for example Code Quality or MRM. Each request targets one responsibility.
- Select Specific Reviewer is a checkbox above the Reviewer dropdown. Left on (the default), you pick one user under Reviewer (required) and only that user is notified and can act. Turned off, every reviewer assigned to the responsibility is notified, and any of them can act.
Attach evidence and send
Section titled “Attach evidence and send”
Attach evidence and send
Section titled “Attach evidence and send”Next, attach the evidence reviewers see and send the request:
- Under Supporting Analysis (required), pick one or more simulations that have been run on this object. Once the request is approved, every attached job is marked verified. Admins can make this optional in Settings.
- Add an optional Comment, a free-form note for the reviewer.
- Under Add Files, drag a file into the drop zone or click Select a file to upload any supporting attachments.
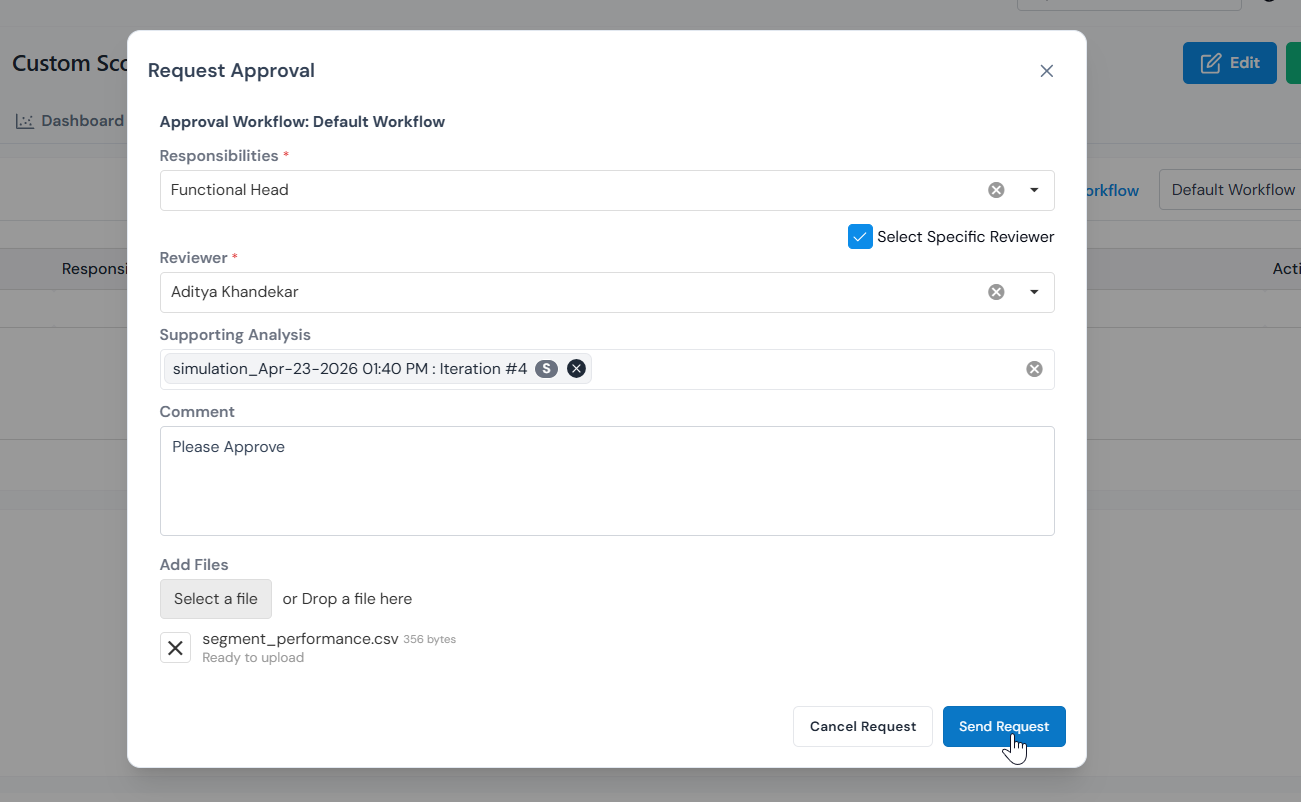
Click Send Request to submit, or Cancel Request to back out. Reviewers are notified by email, in-app, or both, depending on what your Platform Admin has configured.
After you submit: tracking the request
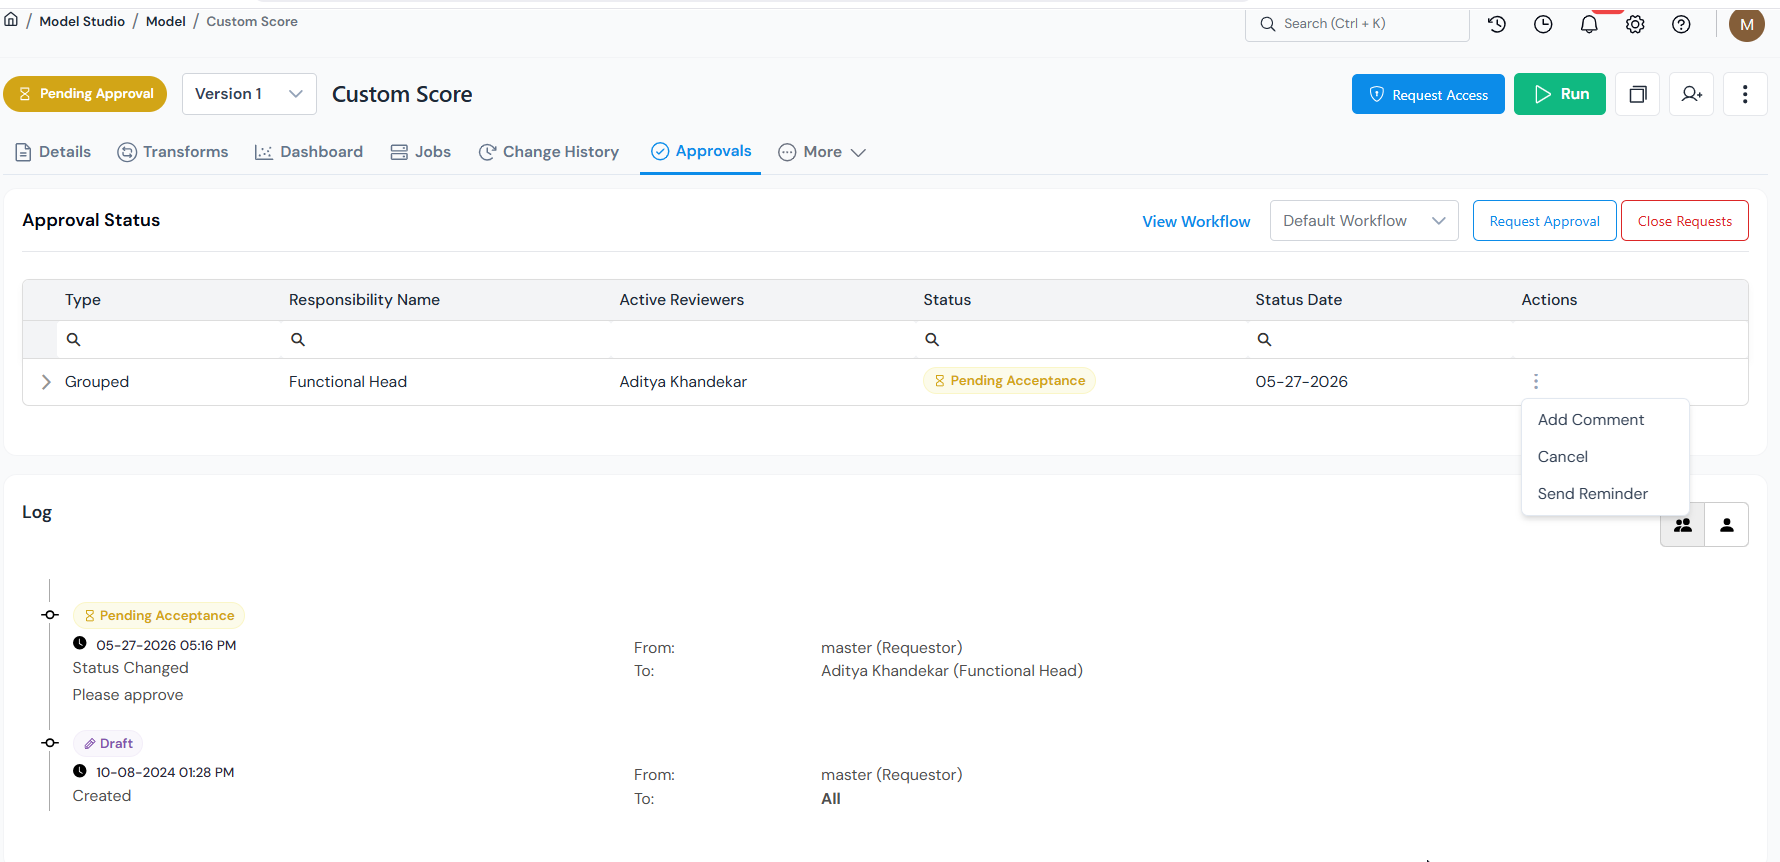
Section titled “After you submit: tracking the request”Once submitted, the object moves to Pending Approval and the Approvals tab becomes your home base. It has two parts.
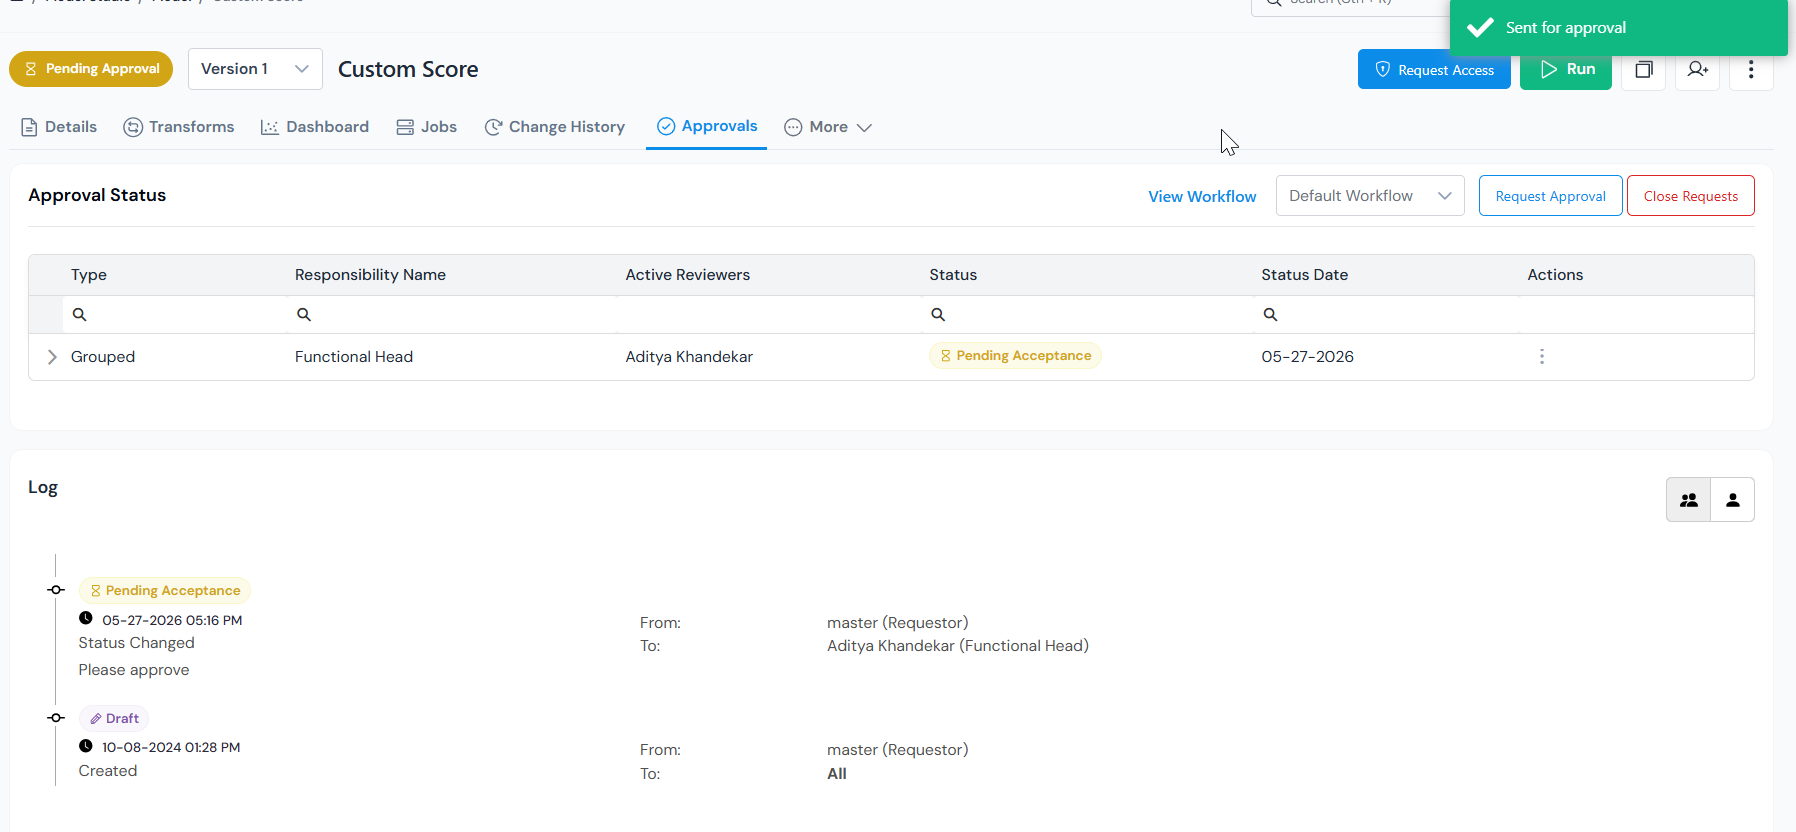
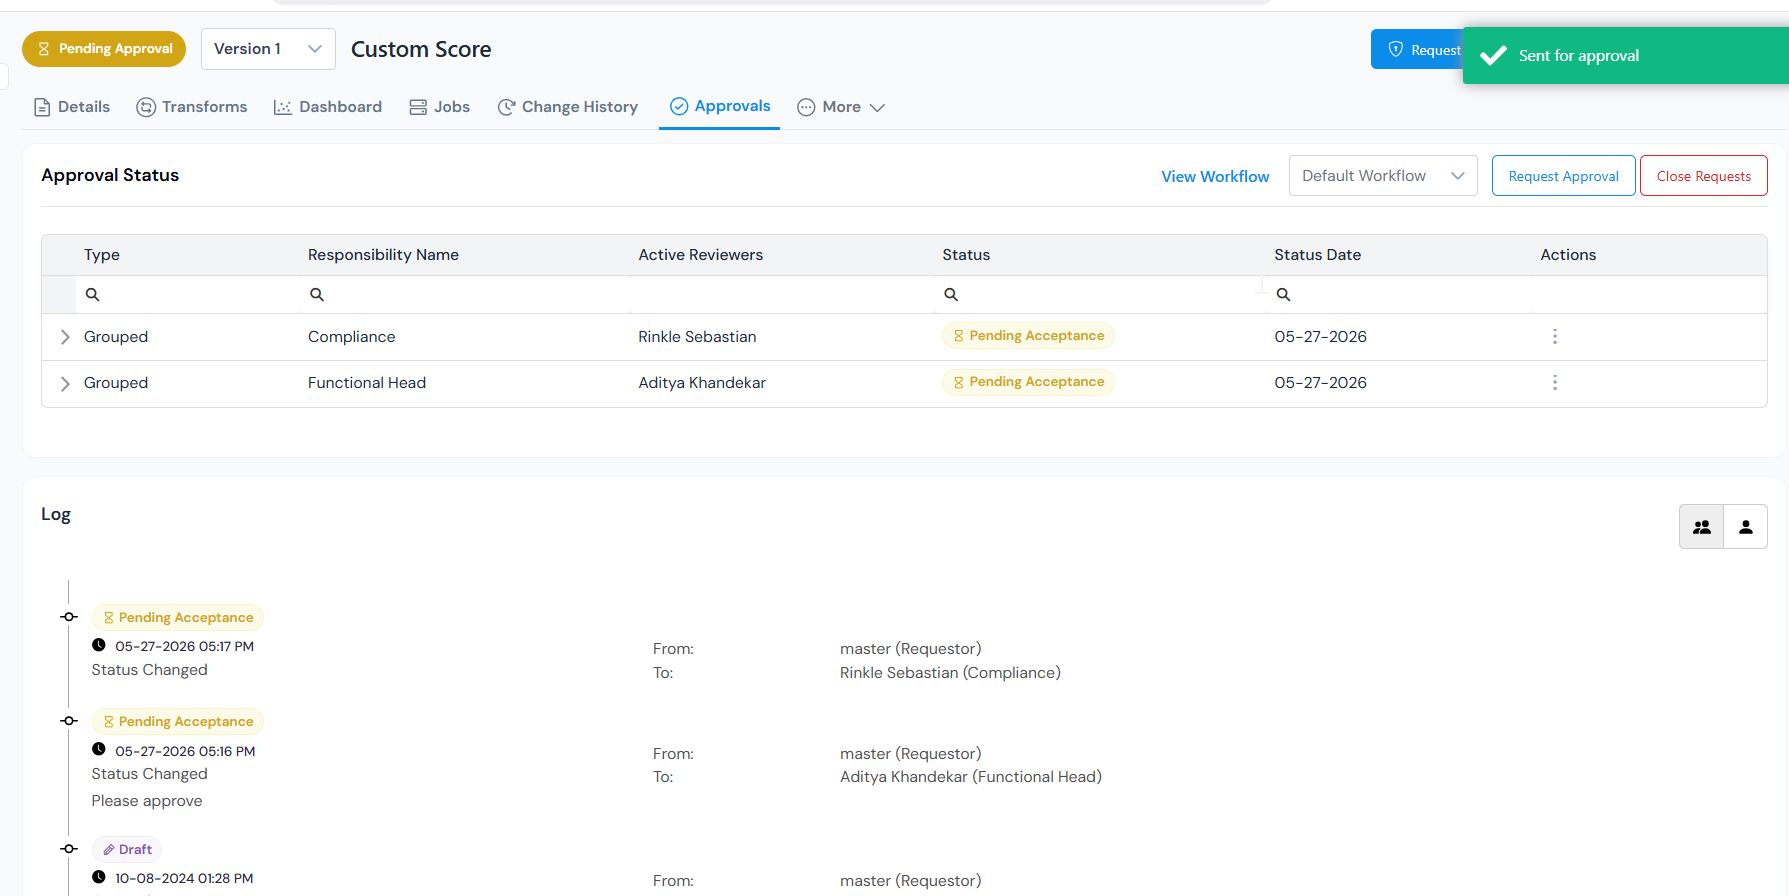
Approval Status table (top): one row per submitted request.
| Column | Shows |
|---|---|
| Type | The Approval Workflow row, or a bundled input under group approval. |
| Responsibility Name | The responsibility this request targets. |
| Active Reviewers | The user(s) who can act on this row. |
| Status | Pending Acceptance, Accepted, Rejected, Need Change, Need Info, or Canceled. |
| Status Date | When the row last changed. |
| Actions | Three-dot menu, see below. |
Log (bottom): a read-only, chronological audit trail of every state change. Each entry records the event, timestamp, From and To (who initiated and where it was directed), the resulting state, and an optional comment.
Can you keep editing during review?
Section titled “Can you keep editing during review?”| Responsibility setup | Editing during review |
|---|---|
| Any responsibility has Veto Power | Locked until all decisions are made. |
| All responsibilities are non-Veto and marked Editable | Stays editable. |
Actions while pending
Section titled “Actions while pending”From the three-dot menu on each row:
- Add Comment: leave a note for the reviewer.
- Send Reminder: nudge a slow reviewer.
- Cancel: cancel only that responsibility’s review (a reason is required). Other rows are unaffected.
Above the table:
- Close Requests: cancels every open review on the object and moves it back to Draft. Use this to stop the whole approval process and resume editing.
Outcomes: what each reviewer status means
Section titled “Outcomes: what each reviewer status means”Each row in the Approval Status table reaches one of these states. Final decisions close the review for that responsibility:
| Status | What it means and what you do |
|---|---|
| Accepted | This responsibility has signed off. When every responsibility is Accepted, the object becomes Approved. |
| Rejected | If the responsibility has Veto Power, the whole request is rejected immediately. By default, any rejection results in rejection. Clone the object to start a new version. |
Interim statuses mean the reviewer needs something back from you:
| Status | What it means and what you do |
|---|---|
| Need Change | The reviewer wants edits. Make the changes and Resubmit (see below). |
| Need Info | The reviewer wants more information (a fresh simulation, a comment, an attachment). Provide it and Resubmit. |
Resubmitting after Need Change or Need Info
Section titled “Resubmitting after Need Change or Need Info”- Open the Approvals tab.
- From the Actions menu on the relevant row, select Resubmit.
- Attach a new simulation as Supporting Analysis if the reviewer asked for one.
- Click Send Request.
The row goes back to Pending Acceptance and the object stays in Pending Approval throughout.
Once everything is Accepted
Section titled “Once everything is Accepted”- The object’s status becomes Approved.
- Other objects can now reference it as an input.
- The version is locked. Any further change creates a new version, which must go through approval again.
Retire an object
Section titled “Retire an object”When an object is no longer meant to be used, Retire takes it out of service. Only an object in a final status can be retired: Approved, or (for policies) Active or Shadow. The action is permanent.
- Open the object, and from its three-dot menu select Retire.
- In the confirmation modal, add a comment. If the object has more than one approved version, tick Retire all versions to retire every approved version under it at once.
- Click Retire. The object’s status becomes Retired.
A retired object can still be cloned, copied, and simulated (including side-by-side comparison against other jobs), so you keep access to its definition and history.
Once you retire an object, the platform enforces that:
- A retired object cannot be selected as an input when you register or edit another object.
- If an object already has a retired input anywhere in its lineage, you cannot request approval for it and reviewers cannot accept it until the retired input is replaced.
What’s next
Section titled “What’s next”- For modelers: once your model or policy is approved, see Monitor your Model or Policy to track its performance in production.
- For admins: setting up the workflows themselves (responsibilities, reviewers, veto, sequence) is covered in Configure an Approval Workflow.
Was this page helpful?
Thanks for the feedback.